第1章 Hello 驱动(不涉及硬件操作)
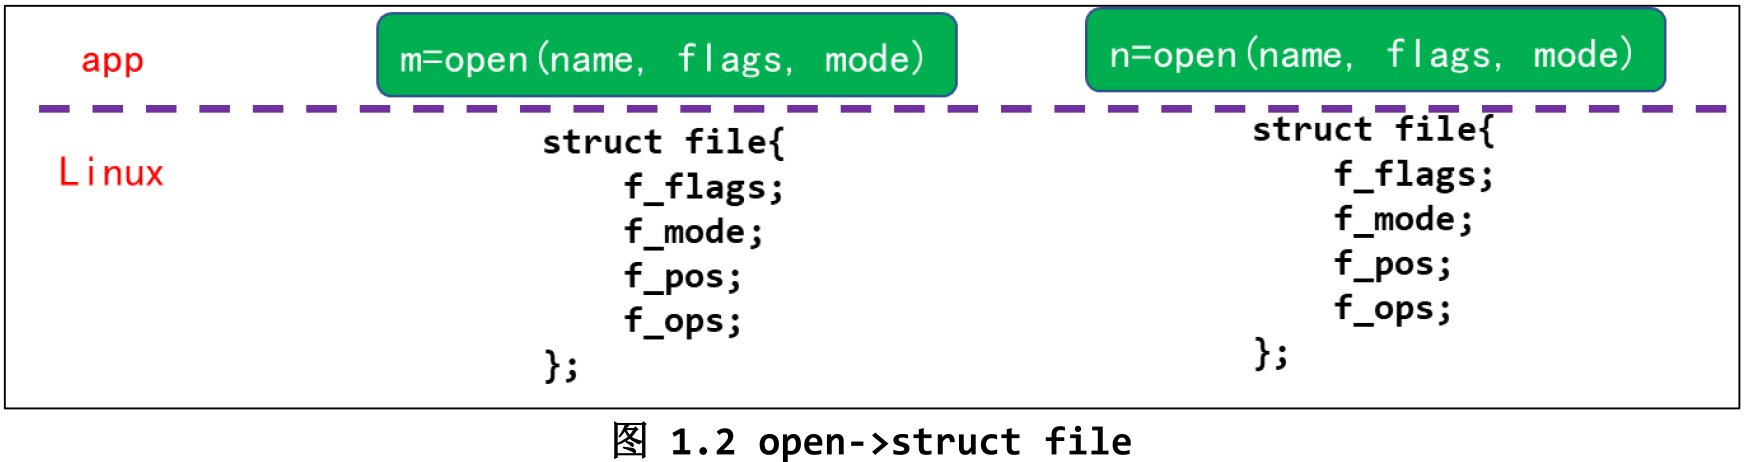
1.1 APP 打开的文件在内核中如何表示
使用 open 打开文件时,传入的 flags、mode 等参数, 读写文件时,文件的当前偏移地址,对文件的操作api,都在 include\linux\fs.h 的 struct file 中。
struct file {
    union {
        struct llist_node   fu_llist;
        struct rcu_head     fu_rcuhead;
    } f_u;
    struct path     f_path;
    struct inode        *f_inode;   /* cached value */
    const struct file_operations    *f_op;

    /*
     * Protects f_ep_links, f_flags.
     * Must not be taken from IRQ context.
     */
    spinlock_t      f_lock;
    atomic_long_t       f_count;
    unsigned int        f_flags;
    fmode_t         f_mode;
    struct mutex        f_pos_lock;
    loff_t          f_pos;
    ...
}
1.2 打开字符设备节点时,内核中也有对应的 struct file
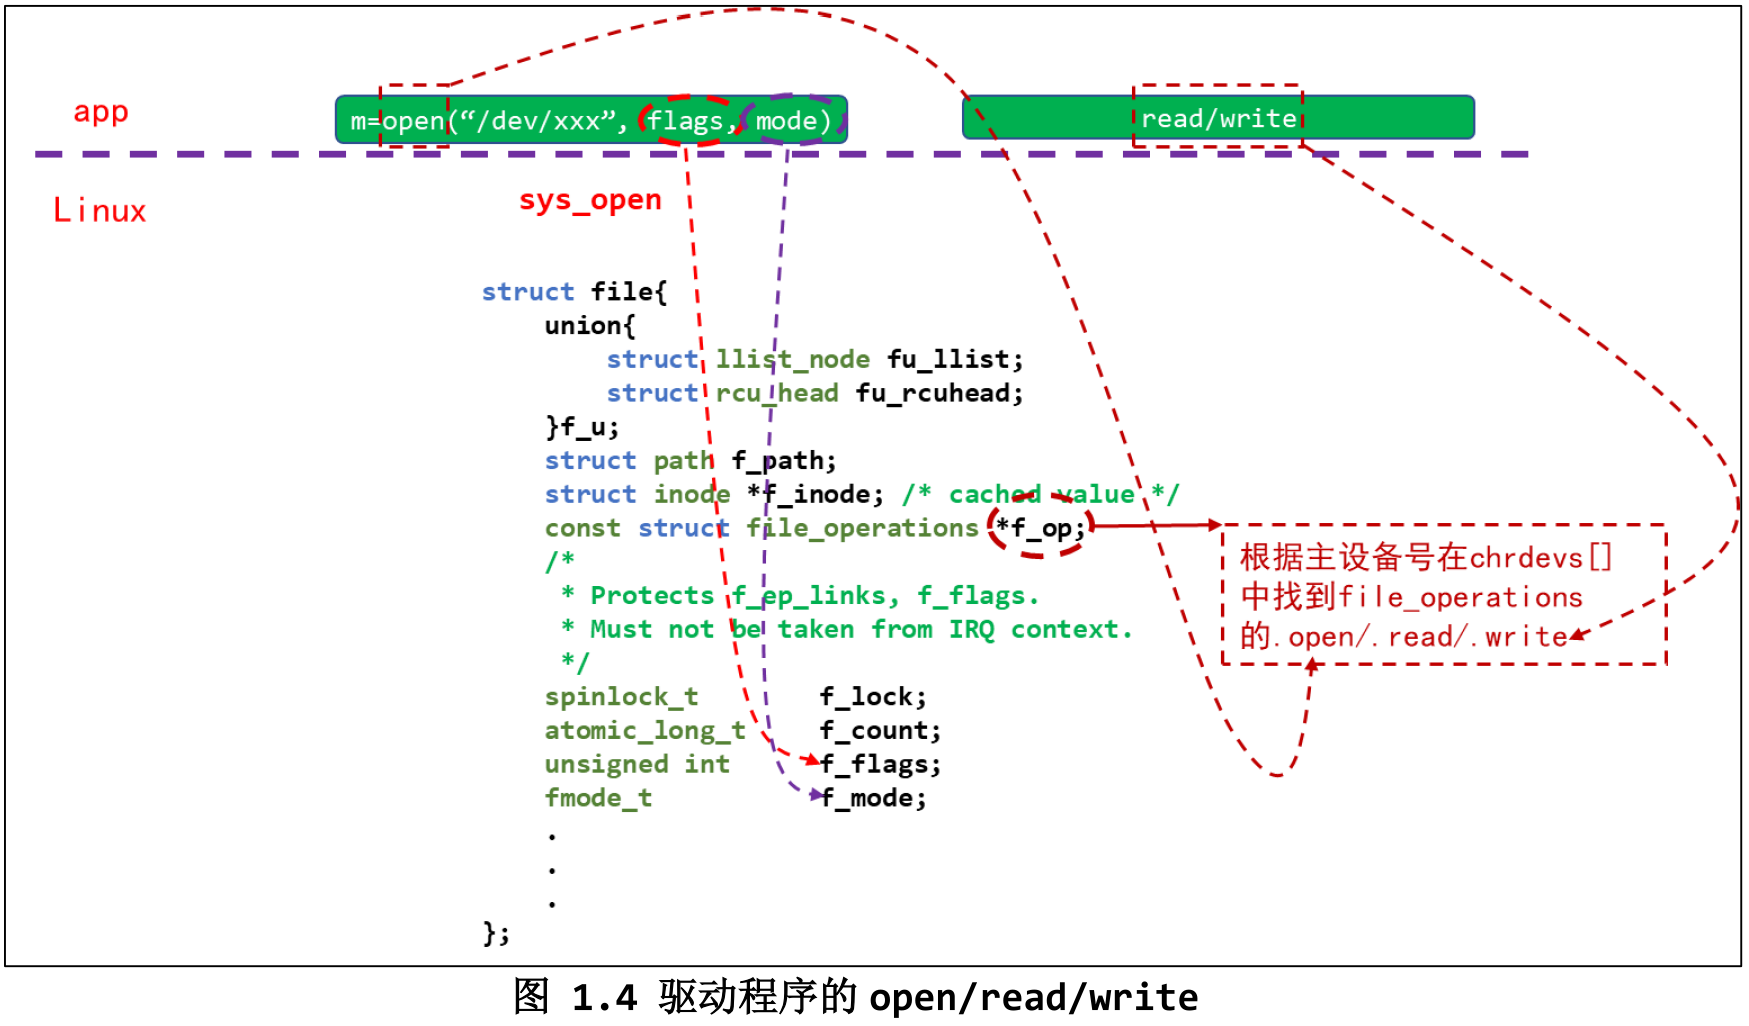
// include\linux\fs.h
struct file_operations {
    struct module *owner;
    loff_t (*llseek) (struct file *, loff_t, int);
    ssize_t (*read) (struct file *, char __user *, size_t, loff_t *);
    ssize_t (*write) (struct file *, const char __user *, size_t, loff_t *);
    ...
    long (*compat_ioctl) (struct file *, unsigned int, unsigned long);
    ...
    int (*open) (struct inode *, struct file *);
    int (*flush) (struct file *, fl_owner_t id);
    int (*release) (struct inode *, struct file *);
    ...
}
1.3 请猜猜怎么编写驱动程序
- 谁来注册驱动程序啊?得有一个入口函数:安装驱动程序时,就会去调用这个入口函数
- 有入口函数就应该有出口函数:卸载驱动程序时,出口函数调用
unregister_chrdev - 把
file_operations结构体告诉内核:register_chrdev - 确定主设备号,也可以让内核分配
- 定义自己的
file_operations结构体 - 实现对应的
drv_open/drv_read/drv_write等函数,填入file_operations结构体 - 其他完善:提供设备信息,自动创建设备节点:
class_create,device_create
1.4 编写代码
1.4.1 写驱动程序
- 入口和出口空程序体
#include <linux/module.h> // init static int __init hello_init(void) { } // exit static void __exit hello_exit(void) { } // module_init(hello_init); module_exit(hello_exit); // license MODULE_LICENSE("GPL"); init里面调用drivers\base\core.c中的struct device *device_create(struct class *class, struct device *parent, dev_t devt, void *drvdata, const char *fmt, ...)。 其中struct class,struct device都是在include/linux/device.h里面定义的。exit里面调用相反的void device_destroy(struct class *class, dev_t devt)#include <linux/device.h> // static int hello_major; static dev_t hello_devt; struct class * hello_class; struct device * hello_deivce; // init static int __init hello_init(void) { hello_devt = MKDEV(hello_major, 0); /** * device_create - creates a device and registers it with sysfs * @class: pointer to the struct class that this device should be registered to * @parent: pointer to the parent struct device of this new device, if any * @devt: the dev_t for the char device to be added * @drvdata: the data to be added to the device for callbacks * @fmt: string for the device's name * * This function can be used by char device classes. A struct device * will be created in sysfs, registered to the specified class. * * A "dev" file will be created, showing the dev_t for the device, if * the dev_t is not 0,0. * If a pointer to a parent struct device is passed in, the newly created * struct device will be a child of that device in sysfs. * The pointer to the struct device will be returned from the call. * Any further sysfs files that might be required can be created using this * pointer. * * Returns &struct device pointer on success, or ERR_PTR() on error. * * Note: the struct class passed to this function must have previously * been created with a call to class_create(). */ hello_deivce = device_create(hello_class, NULL, hello_devt, NULL, "hello") } // exit static void __exit hello_exit(void) { /** * device_destroy - removes a device that was created with device_create() * @class: pointer to the struct class that this device was registered with * @devt: the dev_t of the device that was previously registered * * This call unregisters and cleans up a device that was created with a * call to device_create(). */ device_destroy(hello_class, hello_devt); }- 根据
device_create注释中说明的,需要先用class_create(owner, name), 在include\linux\device.h里面的宏. 还有对应的class_destroy(struct class *cls)。 当然,都是调用drivers\base\class.c里面的函数static int __init hello_init(void) { /** * class_create - create a struct class structure * @owner: pointer to the module that is to "own" this struct class * @name: pointer to a string for the name of this class. * @key: the lock_class_key for this class; used by mutex lock debugging * * This is used to create a struct class pointer that can then be used * in calls to device_create(). * * Returns &struct class pointer on success, or ERR_PTR() on error. * * Note, the pointer created here is to be destroyed when finished by * making a call to class_destroy(). */ hello_class = class_create(THIS_MODULE, "hello"); if (IS_ERR(hello_class)) { printk("%s %s line %d, error %d\n", __FILE__, __FUNCTION__, __LINE__, PTR_ERR(hello_class)); return PTR_ERR(hello_class); } hello_devt = MKDEV(hello_major, 0); hello_deivce = device_create(hello_class, NULL, hello_devt, NULL, "hello") if (IS_ERR(hello_deivce)) { printk("%s %s line %d, error %d\n", __FILE__, __FUNCTION__, __LINE__, PTR_ERR(hello_deivce)); class_destroy(hello_class); return PTR_ERR(hello_deivce); } } // static void __exit hello_exit(void) { device_destroy(hello_class, hello_devt); class_destroy(hello_class); } - major 需要
include\linux\fs.h中的static inline int register_chrdev(unsigned int major, const char *name, const struct file_operations *fops)来生成。#include <linux/fs.h> static struct file_operations * hello_fops; // static int __init hello_init(void) { /** * __register_chrdev() - create and register a cdev occupying a range of minors * @major: major device number or 0 for dynamic allocation * @baseminor: first of the requested range of minor numbers * @count: the number of minor numbers required * @name: name of this range of devices * @fops: file operations associated with this devices * * If @major == 0 this functions will dynamically allocate a major and return * its number. * * If @major > 0 this function will attempt to reserve a device with the given * major number and will return zero on success. * * Returns a -ve errno on failure. * * The name of this device has nothing to do with the name of the device in * /dev. It only helps to keep track of the different owners of devices. If * your module name has only one type of devices it's ok to use e.g. the name * of the module here. */ hello_major = register_chrdev(0, "hello", hello_fops); if (hello_major < 0) { printk("%s %s line %d, error %d\n", __FILE__, __FUNCTION__, __LINE__, hello_major); return hello_major; } hello_class = class_create(THIS_MODULE, "hello"); if (IS_ERR(hello_class)) { printk("%s %s line %d, error %d\n", __FILE__, __FUNCTION__, __LINE__, PTR_ERR(hello_class)); unregister_chrdev(hello_major, "hello"); return PTR_ERR(hello_class); } hello_devt = MKDEV(hello_major, 0); hello_deivce = device_create(hello_class, NULL, hello_devt, NULL, "hello") if (IS_ERR(hello_deivce)) { printk("%s %s line %d, error %d\n", __FILE__, __FUNCTION__, __LINE__, PTR_ERR(hello_deivce)); class_destroy(hello_class); unregister_chrdev(hello_major, "hello"); return PTR_ERR(hello_deivce); } } // static void __exit hello_exit(void) { device_destroy(hello_class, hello_devt); class_destroy(hello_class); unregister_chrdev(hello_major, "hello"); } - 初始化并填充
struct file_operations * hello_fops. 按照include\linux\fs.h中的struct file_operations来。ssize_t (*read) (struct file *, char __user *, size_t, loff_t *);,ssize_t (*write) (struct file *, const char __user *, size_t, loff_t *);,int (*open) (struct inode *, struct file *);,int (*release) (struct inode *, struct file *);.static int hello_buf[1024]; // #define MIN(a, b) (a < b ? a : b) // static ssize_t hello_read (struct file * filp, char __user * buf, size_t count, loff_t * f_pos) { printk("%s %s line %d\n", __FILE__, __FUNCTION__, __LINE__); int missing = copy_to_user(buf, hello_buf, MIN(1024, count)); return MIN(1024, count) - missing; } // static ssize_t hello_write (struct file * filp, const char __user * buf, size_t count, loff_t * f_pos) { printk("%s %s line %d\n", __FILE__, __FUNCTION__, __LINE__); int missing = copy_from_user(hello_buf, buf, MIN(1024, count)); return MIN(1024, count) - missing; } // static int hello_open (struct inode * inode, struct file * filp) { printk("%s %s line %d\n", __FILE__, __FUNCTION__, __LINE__); return 0; } // static int hello_release (struct inode * inode, struct file * filp) { printk("%s %s line %d\n", __FILE__, __FUNCTION__, __LINE__); return 0; } // static struct file_operations hello_fops = { .owner = THIS_MODULE, .write = hello_write, .read = hello_read, .open = hello_open, .release = hello_release, }; - 根据开发板情况,修改 Makefile
KERN_DIR = /home/book/100ask_imx6ull-sdk/Linux-4.9.88 - 根据编译情况,增加相关头文件
#include <linux/uaccess.h>
注意:int register_chrdev(unsigned int major, const char *name, const struct file_operations *fops); 是旧的设备驱动。新的设备驱动可以用 int alloc_chrdev_region(dev_t *dev, unsigned int firstminor, unsigned int count, const char *name); 配合 fs\char_dev.c include/linux/cdev.h 中的 void cdev_init(struct cdev *cdev, const struct file_operations *fops), int cdev_add(struct cdev *p, dev_t dev, unsigned count), 当然,设备卸载的时候,也需要对应的加上 void cdev_del(struct cdev *p), void unregister_chrdev_region(dev_t from, unsigned count)
注意: device_create 和 class_create 也不是必须的。最低要求其实就是 register_chrdev。 class_create 的用处是 /sys/class/ 下生成目录,并且方便作为设备类,统一管理多个设备,还可以与 udev mdev 配合使用。 device_create 的作用是,可以自动在 /dev 下面创建设备节点,如果不用,那就需要使用 mknod 来手动创建节点。
使用alloc_chrdev_region 的代码如下:
static int __init hello_init(void)
{
    printk("%s %s line %d\n", __FILE__, __FUNCTION__, __LINE__);

    if (alloc_chrdev_region(&hello_devt, 0, 1, "hello") < 0) {
        printk("%s %s line, error %d\n", __FILE__, __FUNCTION__, __LINE__);
        return -1;
    }

    cdev_init(&hello_cdev, &hello_fops);
    if (cdev_add(&hello_cdev, hello_devt, 1) < 0) {
        printk("%s %s line, error %d\n", __FILE__, __FUNCTION__, __LINE__);
        unregister_chrdev_region(hello_devt, 1);
        return -1;
    }

    hello_class = class_create(THIS_MODULE, "hello");
    if (IS_ERR(hello_class)) {
        printk("%s %s line %d, error %ld\n", __FILE__, __FUNCTION__, __LINE__, PTR_ERR(hello_class));
        cdev_del(&hello_cdev);
        //unregister_chrdev(hello_major, "hello");
        unregister_chrdev_region(hello_devt, 1);
        return PTR_ERR(hello_class);
    }

    hello_deivce = device_create(hello_class, NULL,
                 hello_devt, NULL, "hello");
    if (IS_ERR(hello_deivce)) {
        printk("%s %s line %d, error %ld\n", __FILE__, __FUNCTION__, __LINE__, PTR_ERR(hello_deivce));
        class_destroy(hello_class);
        cdev_del(&hello_cdev);
        //unregister_chrdev(hello_major, "hello");
        unregister_chrdev_region(hello_devt, 1);
        return PTR_ERR(hello_deivce);
    }

    return 0;
}

static void __exit hello_exit(void)
{
    printk("%s %s line %d\n", __FILE__, __FUNCTION__, __LINE__);
    device_destroy(hello_class, hello_devt);
    class_destroy(hello_class);
    cdev_del(&hello_cdev);
    //unregister_chrdev(hello_major, "hello");
    unregister_chrdev_region(hello_devt, 1);
}
1.4.3 测试
echo "7 4 1 7" > /proc/sys/kernel/printk显示内核打印信息insmod hello_drv.ko安装驱动, 或者insmod -f hello_drv.kols /dev/hello -l查看设备节点./hello_drv_test -w www.100ask.net,./hello_drv_test -r测试lsmod,rmmod hello_drv
第5章 最简单的 LED 驱动程序
5.2 最简单的 LED 驱动程序编程_基于 IMX6ULL
5.2.2 实现什么功能
- 使用
static inline void __iomem *ioremap(phys_addr_t offset, size_t size)把 io 映射到内存中,然后就可以直接读写内存来驱动硬件。 需要包含头文件#include <asm/io.h> - 卸载时,用
iounmap来取消映射。 - 使用
ioremap映射的变量,也需要用volatile进行修饰。另外这些变量,如果考虑内存屏障,优化等问题,推荐使用iowrite,ioread这些函数。
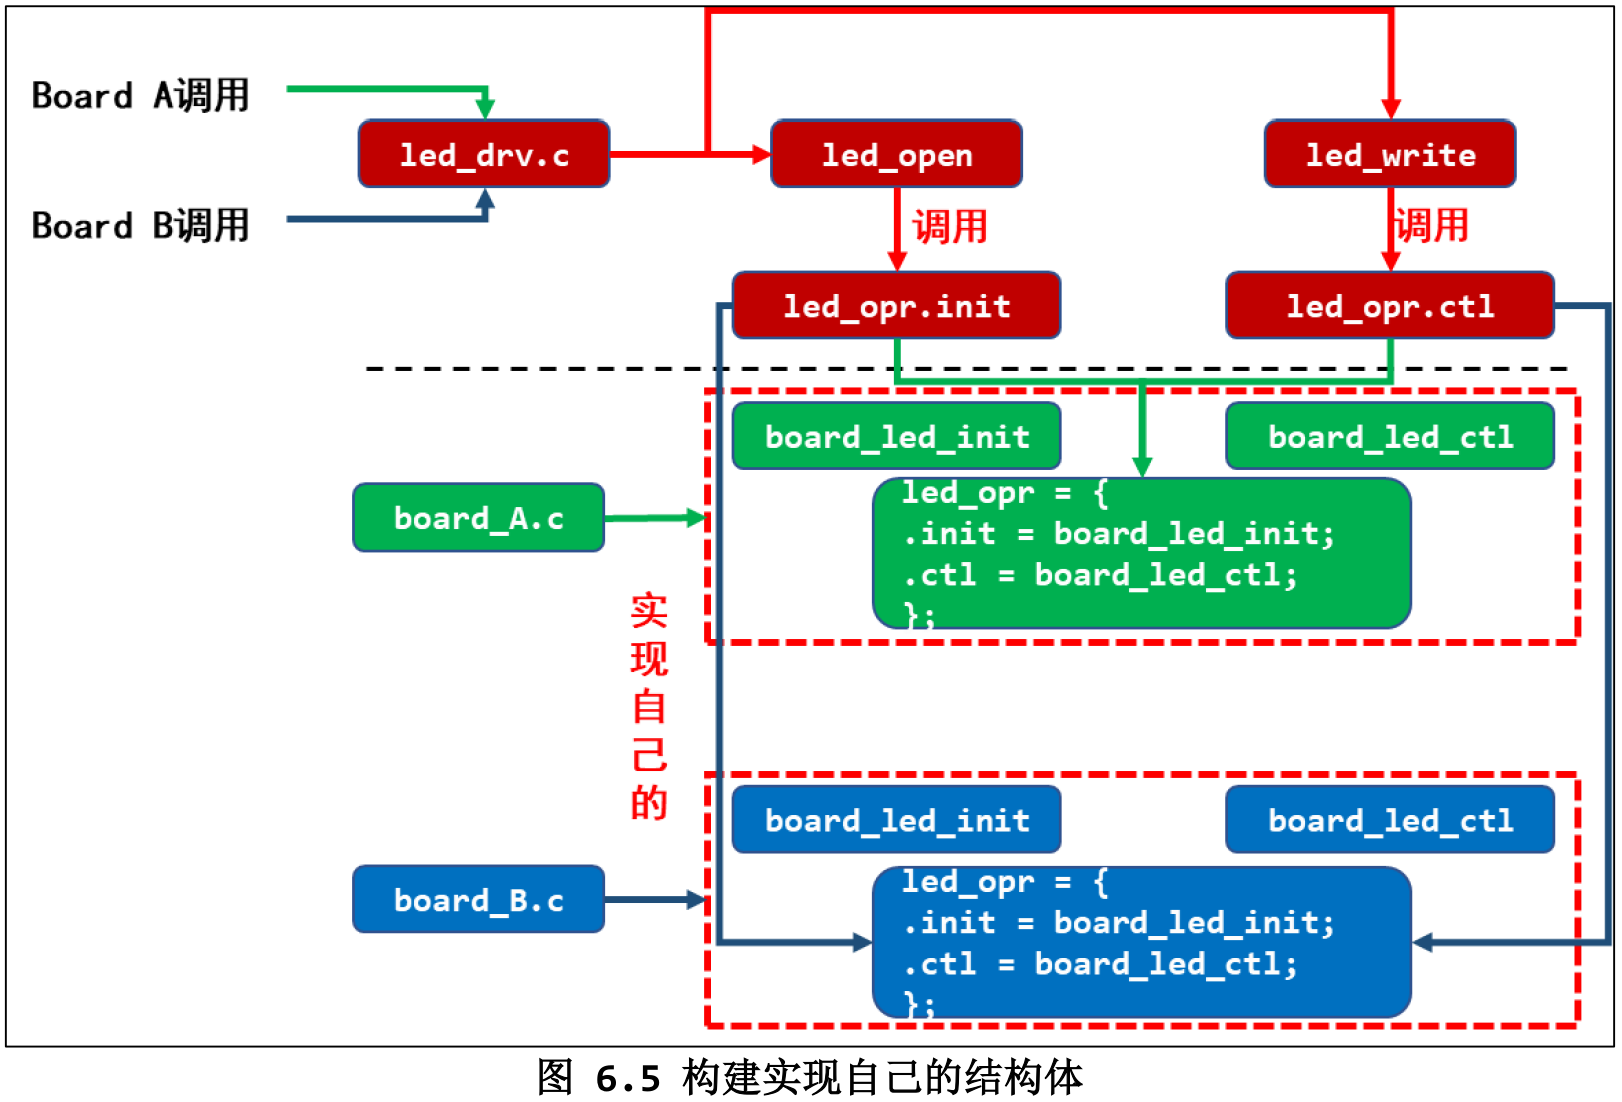
第6章 LED 驱动程序框架
6.3 LED 驱动能支持多个板子的基础:分层思想
6.4 写代码
6.4.1 驱动程序
- 多个 led, 所以 init 和 exit 中,
device_create需要多个for (i = 0; i < LED_NUM; i++) device_create(led_class, NULL, MKDEV(major, i), NULL, "100ask_led%d", i); /* /dev/100ask_led0,1,... */for (i = 0; i < LED_NUM; i++) device_destroy(led_class, MKDEV(major, i)); /* /dev/100ask_led0,1,... */ - 多个 led,在
open,write等中,需要针对某个 led 进行操作,只能使用次设备号来分辨。有 inode 时,直接int minor = iminor(node);来获取次设备号。没有 inode 有文件名时,通过struct inode *inode = file_inode(file);先获取 inode,再获取次设备号。static ssize_t led_drv_write (struct file *file, const char __user *buf, size_t size, loff_t *offset) { ... struct inode *inode = file_inode(file); int minor = iminor(inode); ... /* 根据次设备号和status控制LED */ p_led_opr->ctl(minor, status); return 1; } // static int led_drv_open (struct inode *node, struct file *file) { int minor = iminor(node); ... /* 根据次设备号初始化LED */ p_led_opr->init(minor); return 0; }
第7章 具体单板的 LED 驱动程序
7.2 百问网 IMX6ULL 的 LED 驱动程序
7.2.3 写程序
从板级文件中获取 led 数目,然后 device_create
static struct led_operations board_demo_led_opr = {
    .num  = 1,
    .init = board_demo_led_init,
    .ctl  = board_demo_led_ctl,
};
p_led_opr = get_board_led_opr();
for (i = 0; i < p_led_opr->num; i++)
device_create(led_class, NULL, MKDEV(major, i), NULL, "100ask_led%d", i); /* /dev/100ask_led0,1,... */ for (i = 0; i < p_led_opr->num; i++)
device_destroy(led_class, MKDEV(major, i)); /* /dev/100ask_led0,1,... */第8章 驱动设计的思想
8.3 分离
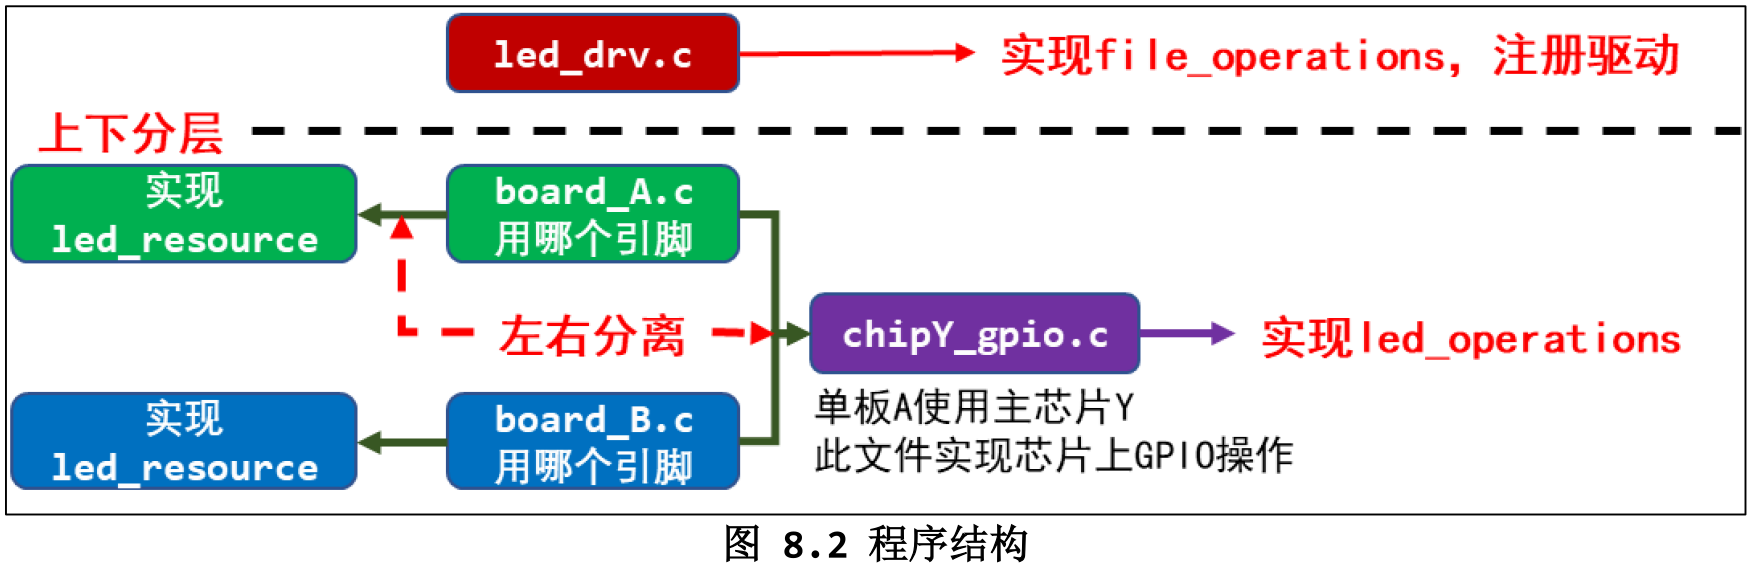
8.4 写示例代码
把具体的 gpio 放在一个 resource.h 的头文件中。这种方法适合于专门做模块的或者适配多种开发板。 对于普通做产品的,这种方法不合算。
第9章 驱动进化之路:总线设备驱动模型
9.2 在 Linux 中实现“分离”:Bus/Dev/Drv 模型
主要涉及 include\linux\platform_device.h 中的 struct platform_device, struct platform_driver, 和 include\linux\device.h 中的 struct bus_type.
// include\linux\platform_device.h
struct platform_device {
    const char  *name;
    int     id;
    bool        id_auto;
    struct device   dev;
    u32     num_resources;
    struct resource *resource;

    const struct platform_device_id *id_entry;
    char *driver_override; /* Driver name to force a match */

    /* MFD cell pointer */
    struct mfd_cell *mfd_cell;

    /* arch specific additions */
    struct pdev_archdata    archdata;
};
// include\linux\platform_device.h
struct platform_driver {
int (*probe)(struct platform_device *);
int (*remove)(struct platform_device *);
void (*shutdown)(struct platform_device *);
int (*suspend)(struct platform_device *, pm_message_t state);
int (*resume)(struct platform_device *);
struct device_driver driver;
const struct platform_device_id *id_table;
bool prevent_deferred_probe;
};// include\linux\device.h
struct bus_type {
const char *name;
const char *dev_name;
struct device *dev_root;
struct device_attribute *dev_attrs; /* use dev_groups instead */
const struct attribute_group **bus_groups;
const struct attribute_group **dev_groups;
const struct attribute_group **drv_groups;
int (*match)(struct device *dev, struct device_driver *drv);
int (*uevent)(struct device *dev, struct kobj_uevent_env *env);
int (*probe)(struct device *dev);
int (*remove)(struct device *dev);
void (*shutdown)(struct device *dev);
int (*online)(struct device *dev);
int (*offline)(struct device *dev);
int (*suspend)(struct device *dev, pm_message_t state);
int (*resume)(struct device *dev);
const struct dev_pm_ops *pm;
const struct iommu_ops *iommu_ops;
struct subsys_private *p;
struct lock_class_key lock_key;
};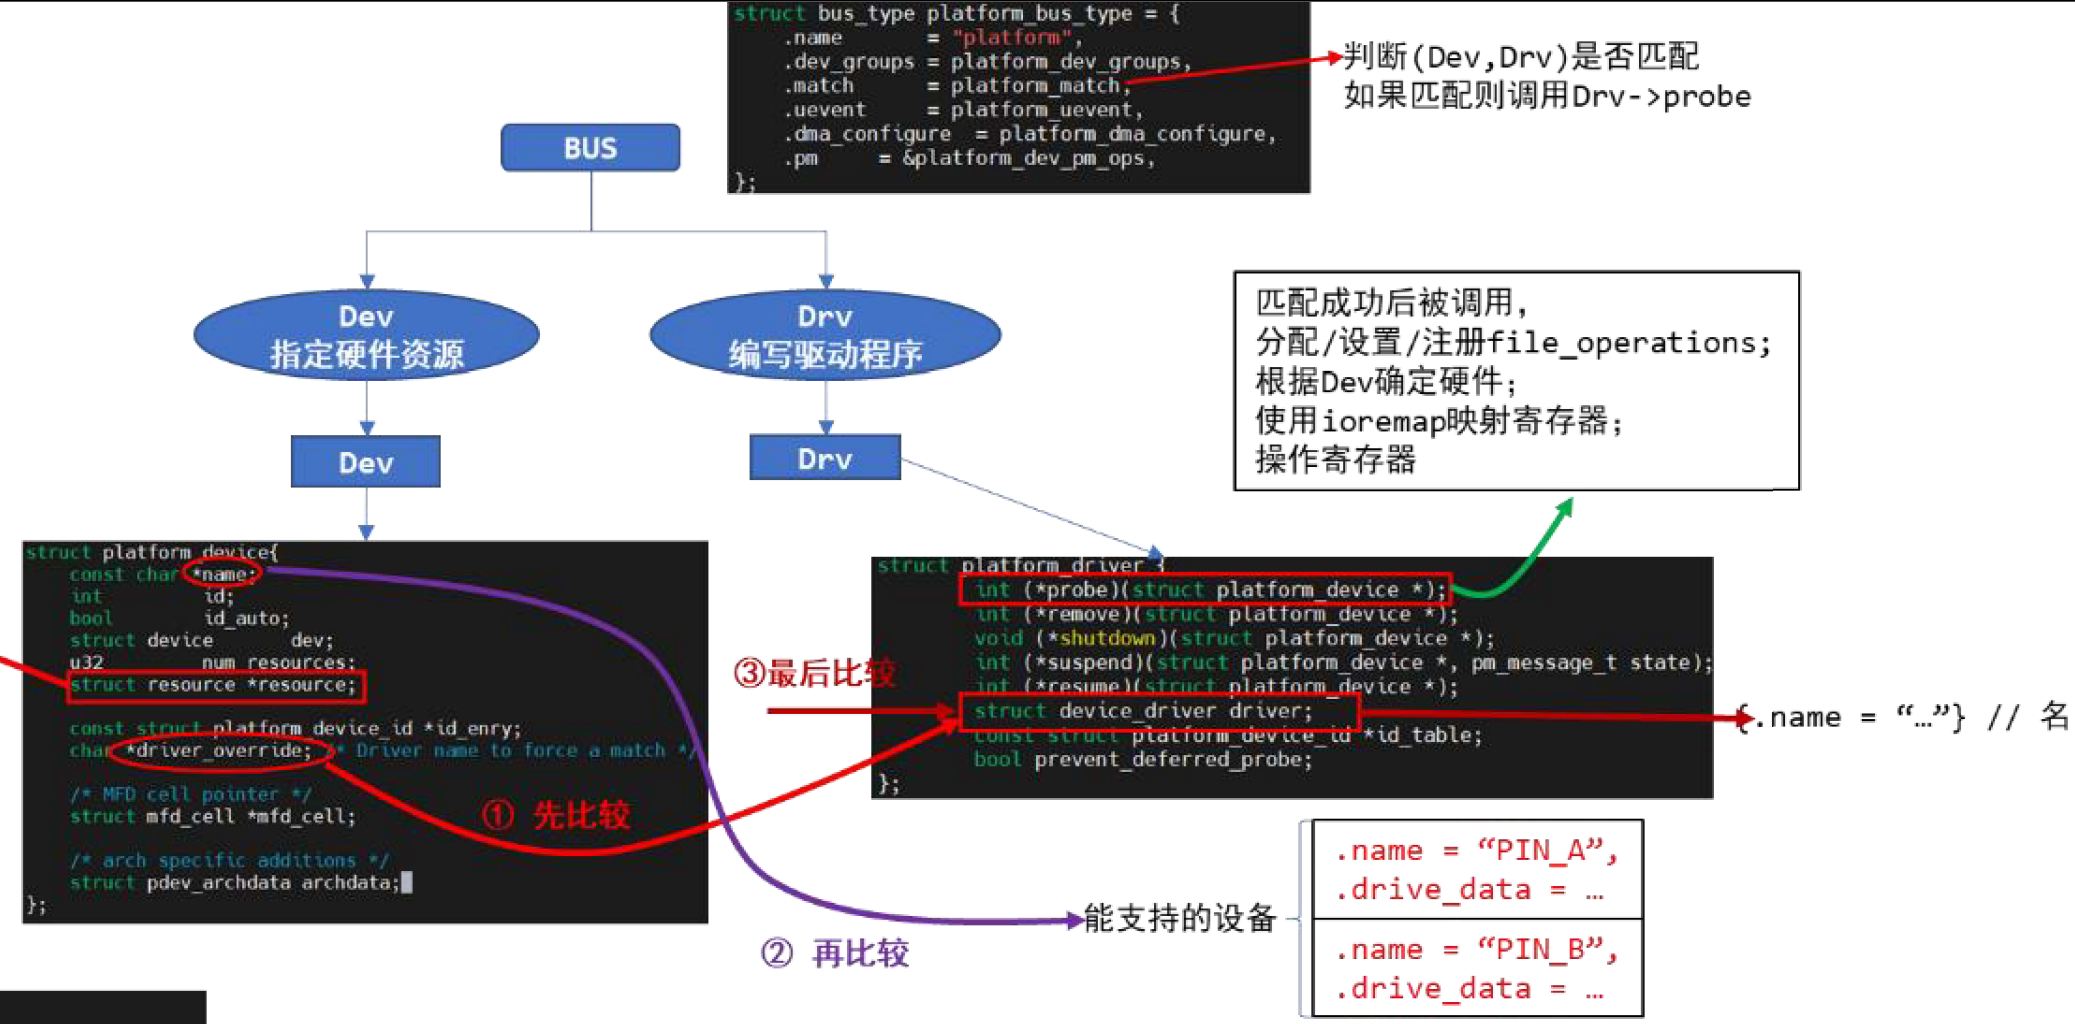
9.3 匹配规则
device 和 driver 匹配,按照优先顺序如下:
- 强行匹配:
platform_device.driver_override=platform_driver.driver.name - 列表匹配:
platform_device.name=platform_driver.platform_device_id.name[] - 名称匹配:
platform_device.name=platform_driver.driver.name
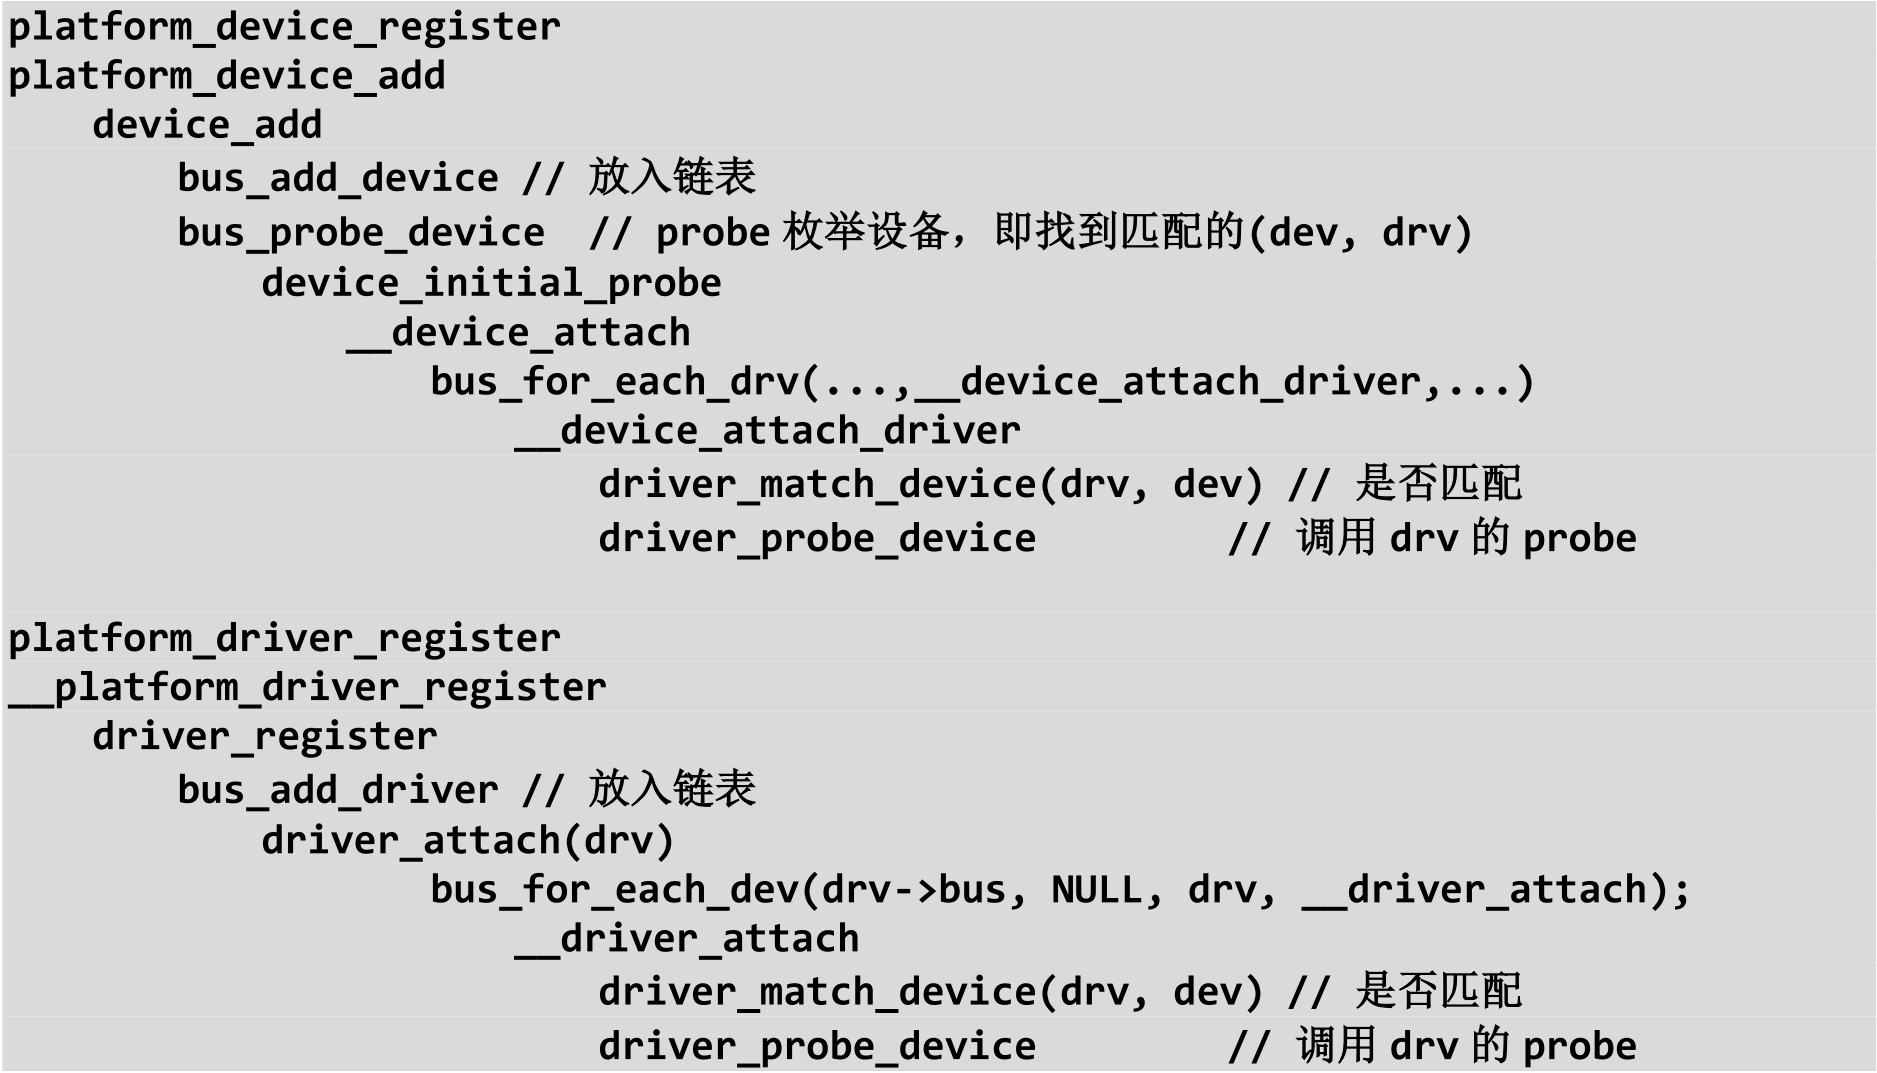
9.3.4 函数调用关系
9.4 常用函数
9.4.1 注册/反注册
platform_device_registerplatform_device_unregisterplatform_driver_registerplatform_driver_unregisterplatform_add_devices
9.4.2 获得资源
struct resource *platform_get_resource(struct platform_device *dev, unsigned int type, unsigned int num)返回该 dev 中某类型(type)资源中的第几个(num)int platform_get_irq(struct platform_device *dev, unsigned int num)返回该 dev 所用的第几个(num)中断struct resource *platform_get_resource_byname(struct platform_device *dev, unsigned int type, const char *name)通过名字(name)返回该 dev 的某类型(type)资源int platform_get_irq_byname(struct platform_device *dev, const char *name)通过名字(name)返回该 dev 的中断号
第10章 LED 模板驱动程序的改造:总线设备驱动模型
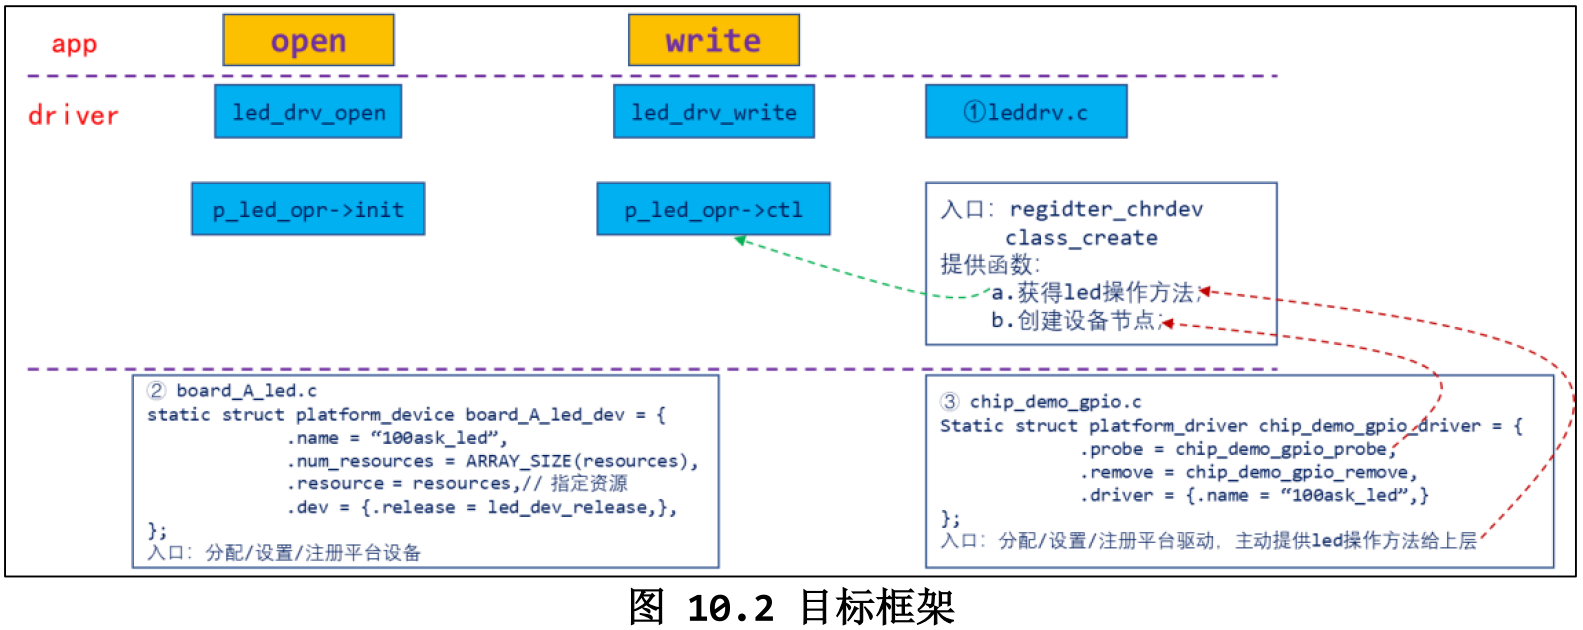
10.2 要实现的框架
10.3 写代码
10.3.1 注意事项
platform_device.dev.release必须提供,否则在卸载时,会有警告- 供给其他模块调用的函数,也需要用
EXPORT_SYMBOL(), 并且模块需要先加载。
10.3.2 实现 platform_device 结构体
resource.start可以用来存放数据,static struct resource resources[] = { { .start = GROUP_PIN(3,1), .flags = IORESOURCE_IRQ, .name = "100ask_led_pin", }, };- resources 元素个数,可以用
ARRAY_SIZE()static struct platform_device board_A_led_dev = { .name = "100ask_led", .num_resources = ARRAY_SIZE(resources), .resource = resources, .dev = { .release = led_dev_release, }, }; - 加载和卸载函数,直接调用
platform_device_register(&board_A_led_dev),platform_device_unregister(&board_A_led_dev)
10.3.3 实现 platform_driver 结构体
platform_driver很简单static struct platform_driver chip_demo_gpio_driver = { .probe = chip_demo_gpio_probe, .remove = chip_demo_gpio_remove, .driver = { .name = "100ask_led", }, };- 加载,使用
platform_driver_register(&chip_demo_gpio_driver) - 卸载,使用
platform_driver_unregister(&chip_demo_gpio_driver) chip_demo_gpio_probe中 使用platform_get_resource(pdev, IORESOURCE_IRQ, i++)获取 device 中的 resource,然后调用device_create函数chip_demo_gpio_remove中使用platform_get_resource(pdev, IORESOURCE_IRQ, i);获取 resource ,然后调用device_destroy- 从框架上来看,
device是提供下层资源,driver是实际的去添加设备,并且把相关的操作资源等等提供给上层的led_drv.led_drv做更加靠近上层的 open, write 之类的。
第11章 驱动进化之路:设备树的引入及简明教程
11.1 设备树的引入与作用
11.2.1 Devicetree 格式
- DTS 文件的格式
/dts-v1/; // 表示版本 [memory reservations] // 格式为: /memreserve/ <address> <length>; / { [property definitions] [child nodes] }; - node 的格式
[label:] node-name[@unit-address] {
[properties definitions]
[child nodes]
};
/dts-v1/; / { // label 是标号,可以省略。label 的作用是为了方便地引用 node uart0: uart@fe001000 { compatible="ns16550"; reg=<0xfe001000 0x100>; }; };// 在根节点之外使用 label 引用 node: &uart0 { status = “disabled”; }; // 或在根节点之外使用全路径: &{/uart@fe001000} { status = “disabled”; }; - properties 的格式
[label:] property-name = value; [label:] property-name; - Property 取值只有 3 种, arrays of cells(1 个或多个 32 位数据, 64 位数据使用 2 个 32 位数据表示), string(字符串), bytestring(1 个或多个字节)
// Arrays of cells : cell 就是一个 32 位的数据,用尖括号包围起来
interrupts = <17 0xc>;
// 64bit 数据使用 2 个 cell 来表示,用尖括号包围起来:
clock-frequency = <0x00000001 0x00000000>;
// A null-terminated string (有结束符的字符串),用双引号包围起来
compatible = "simple-bus";
//  A bytestring(字节序列)  ,用中括号包围起来:
local-mac-address = [00 00 12 34 56 78];  // 每个 byte 使用 2 个 16 进制数来表示
local-mac-address = [000012345678];       // 每个 byte 使用 2 个 16 进制数来表示
// 可以是各种值的组合, 用逗号隔开:
compatible = "ns16550", "ns8250";
example = <0xf00f0000 19>, "a strange property format";
11.2.2 dts 文件包含 dtsi 文件
- 设备树文件不需要我们从零写出来,内核支持了某款芯片比如 imx6ull,在内核的 arch/arm/boot/dts 目录下就有了能用的设备树模板,一般命名为 xxxx.dtsi。“i”表示“include”,被别的文件引用的。
- dtsi 文件跟 dts 文件的语法是完全一样的
- dts 中可以包含.h 头文件,也可以包含 dtsi 文件,在.h 头文件中可以定义一些宏。
/dts-v1/;
#include <dt-bindings/input/input.h>
#include "imx6ull.dtsi"
//
/ {
……
};
11.2.3 常用的属性
#address-cells、#size-cells地址和大小. address 要用多少个 32 位数来表示, size 要用多少个 32 位数来表示// address-cells 为 1,所以 reg 中用 1 个数来表示地址,即用 0x80000000 来表示地址; // size-cells 为 1,所以 reg 中用 1 个数来表示大小,即用 0x20000000 表示大小 / { #address-cells = <1>; #size-cells = <1>; memory { reg = <0x80000000 0x20000000>; }; };- “compatible”表示“兼容”,对于某个 LED,内核中可能有 A、B、C 三个驱动都支持它,那可以这样写
// compatible 的值,建议取这样的形式:"manufacturer,model",即“厂家名,模块名” led { compatible = “A”, “B”, “C”; }; - model 用来准确地定义这个硬件是什么。
{ compatible = "samsung,smdk2440", "samsung,mini2440"; model = "jz2440_v3"; }; - dtsi 文件中定义了很多设备,但是在你的板子上某些设备是没有的。这时你可以给这个设备节点添加一个 status 属性,设置为“disabled”
// okay, disabled, fail, fail-xxx &uart1 { status = "disabled"; }; - reg 用来表示寄存器地址, 在设备树里,它可以用来描述一段空间。反正对于 ARM 系统,寄存器和内存是统一编址的,即访问寄存器时用某块地址,访问内存时用某块地址,在访问方法上没有区别。reg 属性的值,是一系列的“address size”,用多少个 32 位的数来表示address 和 size,由其父节点的#address-cells、#size-cells 决定。
/dts-v1/; / { #address-cells = <1>; #size-cells = <1>; memory { reg = <0x80000000 0x20000000>; }; }; - name(过时了,建议不用)在跟 platform_driver 匹配时,优先级最低。compatible 属性在匹配过程中,优先级最高。
- device_type(过时了,建议不用)它的值是字符串,用来表示节点的类型。在跟 platform_driver 匹配时,优先级为中。
11.2.4 常用的节点(node)
- 根节点 dts 文件中必须有一个根节点
/dts-v1/; / { model = "SMDK24440"; compatible = "samsung,smdk2440"; #address-cells = <1>; #size-cells = <1>; }; - CPU 节点 一般不需要我们设置,在 dtsi 文件中都定义好了
- memory 节点, 芯片厂家不可能事先确定你的板子使用多大的内存,所以 memory 节点需要板厂设置
memory { reg = <0x80000000 0x20000000>; }; - chosen 节点, 我们可以通过设备树文件给内核传入一些参数,这要在 chosen 节点中设置 bootargs 属性
chosen {
bootargs = "noinitrd root=/dev/mtdblock4 rw init=/linuxrc console=ttySAC0,115200";
};
11.3 编译、更换设备树
11.3.1 在内核中直接 make
内核源码的目录 make dtbs V=1
11.3.2 手工编译
- 除非你对设备树比较了解,否则不建议手工使用 dtc 工具直接编译。内核目录下 scripts/dtc/dtc 是设备树的编译工具,直接使用它的话,包含其他文件时不能使用“#include”,而必须使用“/incldue”.
- 编译、反编译的示例命令如下,“-I”指定输入格式,“-O”指定输出格式,“-o”指定输出文件
./scripts/dtc/dtc -I dts -O dtb -o tmp.dtb arch/arm/boot/dts/xxx.dts  // 编译 dts 为 dtb
./scripts/dtc/dtc -I dtb -O dts -o tmp.dts arch/arm/boot/dts/xxx.dtb  // 反编译 dtb 为dts
11.3.3 给开发板更换设备树文件
内核源码目录中执行 make dtbs
11.3.4 板子启动后查看设备树
ls /sys/firmware/
/sys/firmware/devicetree目录下是以目录结构程现的 dtb 文件, 根节点对应 base 目录, 每一个节点对应一个目录, 每一个属性对应一个文件。属性的值如果是字符串,可以使用 cat 命令把它打印出来;对于数值,可以用 hexdump 把它打印出来。/sys/firmware/fdt文件,它就是 dtb 格式的设备树文件,可以把它复制出来放到 ubuntu 上,执行下面的命令反编译出来(-I dtb:输入格式是 dtb,-O dts:输出格式是 dts)cd 板子所用的内核源码目录 ./scripts/dtc/dtc -I dtb -O dts /从板子上/复制出来的/fdt -o tmp.dts
11.4 内核对设备树的处理
- dts 在 PC 机上被编译为 dtb 文件;
- u-boot 把 dtb 文件传给内核;
- 内核解析 dtb 文件,把每一个节点都转换为 device_node 结构体;
- 对于某些 device_node 结构体,会被转换为 platform_device 结构体。
11.4.1 dtb 中每一个节点都被转换为 device_node 结构体
- 数值保存在
device_node.property - 根节点被保存在全局变量 of_root 中,从 of_root 开始可以访问到任意节点。
11.4.2 哪些设备树节点会被转换为 platform_device
- 根节点下含有 compatile 属性的子节点
- 含有特定 compatile 属性的节点的子节点
- 总线 I2C、SPI 节点下的子节点:不转换为 platform_device
11.4.3 怎么转换为 platform_device
- platform_device 中含有 resource 数组, 它来自 device_node 的 reg, interrupts 属性;
- platform_device.dev.of_node 指向 device_node, 可以通过它获得其他属性
11.5 platform_device 如何与 platform_driver 配对
从设备树转换得来的 platform_device 会被注册进内核里,以后当我们每注册一个 platform_driver 时,它们就会两两确定能否配对,如果能配对成功就调用 platform_driver 的 probe 函数。
// drivers\base\platform.c
static int platform_match(struct device *dev, struct device_driver *drv)
{
    struct platform_device *pdev = to_platform_device(dev);
    struct platform_driver *pdrv = to_platform_driver(drv);

    /* When driver_override is set, only bind to the matching driver */
    if (pdev->driver_override)
        return !strcmp(pdev->driver_override, drv->name);

    /* Attempt an OF style match first */
    if (of_driver_match_device(dev, drv))
        return 1;

    /* Then try ACPI style match */
    if (acpi_driver_match_device(dev, drv))
        return 1;

    /* Then try to match against the id table */
    if (pdrv->id_table)
        return platform_match_id(pdrv->id_table, pdev) != NULL;

    /* fall-back to driver name match */
    return (strcmp(pdev->name, drv->name) == 0);
}
从上面的源码,可以很明显的看出,设备树是第二个优先级的匹配。
11.5.2 然后比较:设备树信息
platform_device.dev.of_node = platform_driver.driver.of_match_table
// platform_device.dev.of_node
// include\linux\of.h
struct device_node {
    const char *name;
    const char *type;  // device_type
    ...
    struct  property *properties; // compatible
};
// platform_driver.driver.of_match_table
// include\linux\mod_devicetable.h
struct of_device_id {
char name[32];
char type[32];
char compatible[128];
const void *data;
};首先,比较 compatible, 然后是 type, 最后是 name. 设备树中建议不再使用 devcie_type 和 name 属性,所以基本上只使用设备节点的 compatible 属性来寻找匹配的 platform_driver。
11.7 内核里操作设备树的常用函数
内核源码中 include/linux/目录下有很多 of 开头的头文件,of 表示“open firmware”即开放固件。
11.7.1 内核中设备树相关的头文件介绍
设备树的处理过程是:dtb -> device_node -> platform_device。
- 处理 DTB
of_fdt.h // dtb 文件的相关操作函数, 我们一般用不到, // 因为 dtb 文件在内核中已经被转换为 device_node 树(它更易于使用) - 处理 device_node
of.h // 提供设备树的一般处理函数, // 比如 of_property_read_u32(读取某个属性的 u32 值), // of_get_child_count(获取某个 device_node 的子节点数) of_address.h // 地址相关的函数, // 比如 of_get_address(获得 reg 属性中的 addr, size 值) // of_match_device (从 matches 数组中取出与当前设备最匹配的一项) of_dma.h // 设备树中 DMA 相关属性的函数 of_gpio.h // GPIO 相关的函数 of_graph.h // GPU 相关驱动中用到的函数, 从设备树中获得 GPU 信息 of_iommu.h // 很少用到 of_irq.h // 中断相关的函数 of_mdio.h // MDIO (Ethernet PHY) API of_net.h // OF helpers for network devices. of_pci.h // PCI 相关函数 of_pdt.h // 很少用到 of_reserved_mem.h // reserved_mem 的相关函数 - 处理 platform_device
of_platform.h      // 把 device_node 转换为 platform_device 时用到的函数,
               // 比如 of_device_alloc(根据 device_node 分配设置 platform_device),
               // of_find_device_by_node (根据 device_node 查找到 platform_device),
               //   of_platform_bus_probe (处理 device_node 及它的子节点)
of_device.h        // 设备相关的函数, 比如 of_match_device
11.7.2 platform_device 相关的函数
of_find_device_by_nodeextern struct platform_device *of_find_device_by_node(struct device_node *np);设备树中的每一个节点,在内核里都有一个 device_node;你可以使用device_node 去找到对应的 platform_device。platform_get_resourcestruct resource *platform_get_resource(struct platform_device *dev, unsigned int type, unsigned int num)这个函数跟设备树没什么关系, 但是设备树中的节点被转换为platform_device 后,设备树中的 reg 属性、interrupts 属性也会被转换为“resource”. 这时,你可以使用这个函数取出这些资源。// 对于设备树节点中的 reg 属性,它对应 IORESOURCE_MEM 类型的资源 // 对于设备树节点中的 interrupts 属性,它对应 IORESOURCE_IRQ 类型的资源。
11.7.3 有些节点不会生成 platform_device,怎么访问它们
- 找到节点 ,
of_find_node_by_pathof_find_node_by_nameof_find_node_by_typeof_find_compatible_nodeof_find_node_by_phandleof_get_parentof_get_next_parentof_get_next_childof_get_next_available_childof_get_child_by_name - 找到属性,
of_find_propertystruct property *of_find_property(const struct device_node *np, const char *name, int *lenp); - 获取属性的值,
of_get_propertyof_property_count_elems_of_sizeof_property_read_u32of_property_read_u64of_property_read_u32_indexof_property_read_variable_u8_arrayof_property_read_variable_u16_arrayof_property_read_variable_u32_arrayof_property_read_variable_u64_arrayof_property_read_string
11.8 怎么修改设备树文件
- 有些芯片,厂家提供了对应的设备树生成工具,可以选择某个引脚用于某些功能,就可以自动生成设备树节点。
- 参考内核文档
Documentation/devicetree/bindings/
第12章 LED 模板驱动程序的改造:设备树
12.2 怎么使用设备树写驱动程序
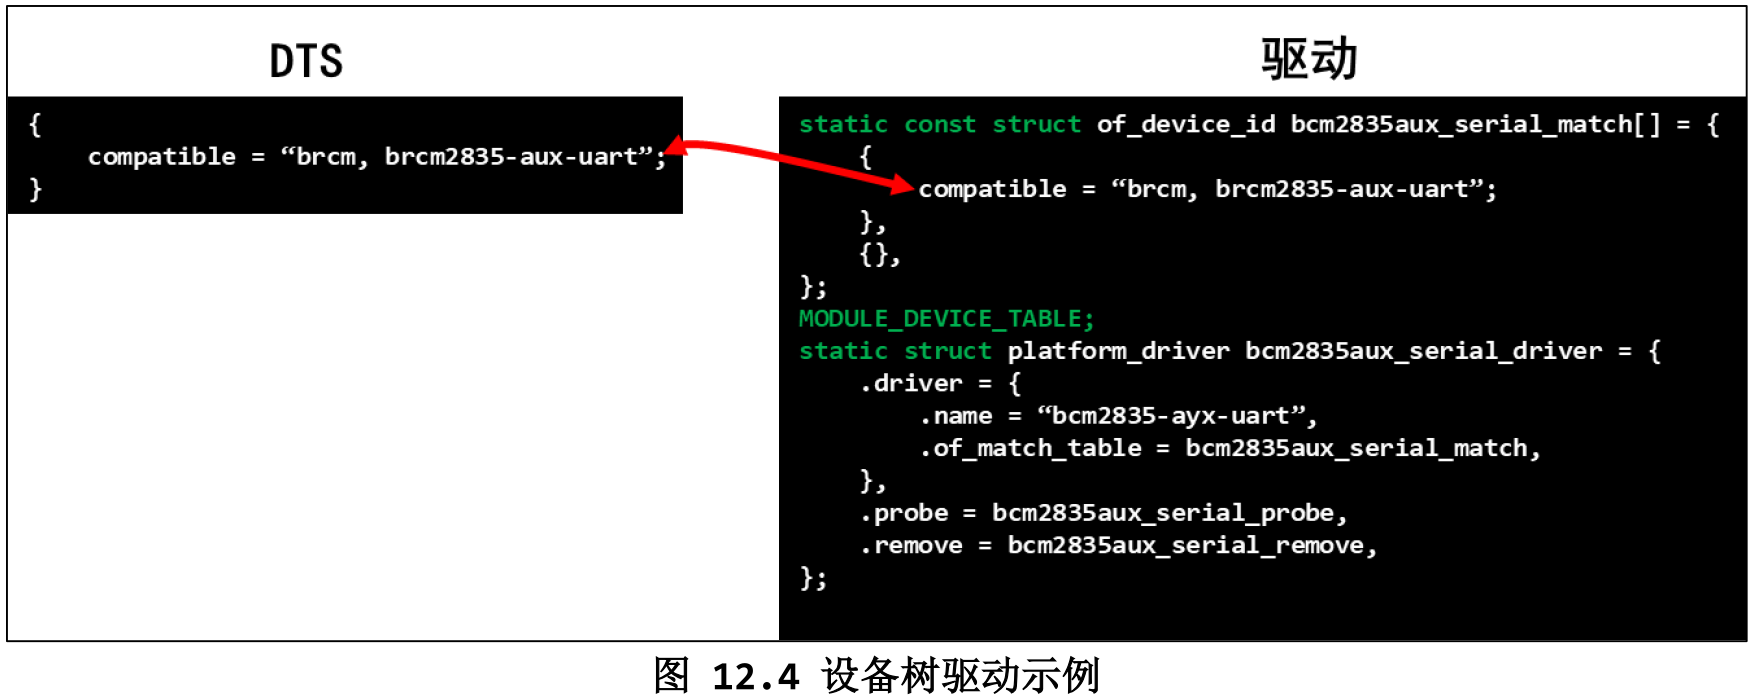
12.2.1 设备树节点要与 platform_driver 能匹配
12.2.2 设备树节点指定资源,platform_driver 获得资源
- 如果在设备树节点里使用 interrupts 属性 , 那么内核生成对应的
platform_device时会用 reg 属性来设置IORESOURCE_IRQ类型的资源。对于interrupts 属性,内核会检查它的有效性,所以不建议在设备树里使用该属性来表示其他资源。 - 可以从
platform_device中得到device_node,再用of_property_read_u32得到属性的值#define GROUP_PIN(g,p) ((g<<16) | (p)) 100ask_led0 { compatible = “100ask,led”; pin = <GROUP_PIN(5, 3)>; };struct device_node* np = pdev->dev. of_node; int led_pin; int err = of_property_read_u32(np, “pin”, &led_pin);
12.3 开始编程
12.3.1 修改设备树添加 led 设备节点
~/100ask_imx6ull-sdk/Linux-4.9.88/arch/arm/boot/dts/100ask_imx6ull-14x14.dts
linux 编译dts 受控于arch/<arch>/boot/dts/Makefile 里面的 dtb-$(CONFIG_<SOC>), dtb-$(CONFIG_<SOC>) 需要去 .config 里面去查看。使用 make dtbs 会编译所有使能的 dts。编译后的 dtb 文件在 arch/<arch>/boot/dts/ 中。
如果想要单独编译某个 dts, make arch/arm/boot/dts/sun8i-h3-nanopi-neo.dtb
#define GROUP_PIN(g,p) ((g<<16) | (p))
model = "Freescale i.MX6 ULL 14x14 EVK Board ptz";
100ask_led@0 {
  compatible = "100ask,leddrv";
  pin = <GROUP_PIN(3, 1)>;
};
 //
100ask_led@1 {
  compatible = "100ask,leddrv";
  pin = <GROUP_PIN(5, 8)>;
}; - 修改之后,
make dtbs编译设备树 - 查看当前设备加载的设备树,
dmesg | grep "OF: fdt:"可以看到设备树的model信息。 - 备份好
/boot下面原来的 dtb,然后把新修改的 dtb 复制替换。 reboot然后,再用dmesg | grep "OF: fdt:"查看,是否加载新的 dtb 了。
12.3.2 修改 platform_driver 的源码
static const struct of_device_id ask100_leds[] = {
    { .compatible = "100ask,leddrv" },
    { },
};
 //
static struct platform_driver chip_demo_gpio_driver = {
    .probe      = chip_demo_gpio_probe,
    .remove     = chip_demo_gpio_remove,
    .driver     = {
        .name   = "100ask_led",
        .of_match_table = ask100_leds,
    },
};
probe remove 函数中,也修改为从设备树获取。而且因为每匹配一次,就 probe 一下,所以 probe 里面的 while 循环也可以去掉了。 remove 也是一样。
static int chip_demo_gpio_probe(struct platform_device *pdev)
{
    struct device_node *np;
    int err = 0;
    int led_pin;

    np = pdev->dev.of_node;
    if (!np)
        return -1;

    err = of_property_read_u32(np, "pin", &led_pin);

    g_ledpins[g_ledcnt] = led_pin;
    led_class_create_device(g_ledcnt);
    g_ledcnt++;

    return 0;

}
第15章 具体单板的按键驱动程序(查询方式)
15.2 百问网 IMX6ULL 的按键驱动程序(查询方式)
15.2.3 编程
- gpio 相关的放结构体中,ioremap 针对整个结构体。
第16章 GPIO 和 Pinctrl 子系统的使用
- 内核
Documentation\devicetree\bindings\Pinctrl\Pinctrl-bindings.txt - 内核
Documentation\gpio\Pinctrl-bindings.txt - 内核
Documentation\devicetree\bindings\gpio\gpio.txt
16.1 Pinctrl 子系统重要概念
16.1.1 引入
Pinctrl管理引脚复用和配置gpio管理 gpio 模块。
16.1.2 重要概念
- 内核
Documentation\devicetree\bindings\Pinctrl\Pinctrl-bindings.txt pin controller用它来复用引脚、配置引脚。它是一个软件上的概念,你可以认为它对应 IOMUX──用来复用引脚,还可以配置引脚(比如上下拉电阻等)。pin controller和GPIO Controller不是一回事, 先用 pin controller 把引脚配置为 GPIO,再用 GPIO Controler 把引脚配置为输入或输出。client device声明自己要使用哪些引脚的哪些功能,怎么配置它们。就是使用 Pinctrl 系统的设备,使用引脚的设备。它在设备树里会被定义为一个节点,在节点里声明要用哪些引脚。
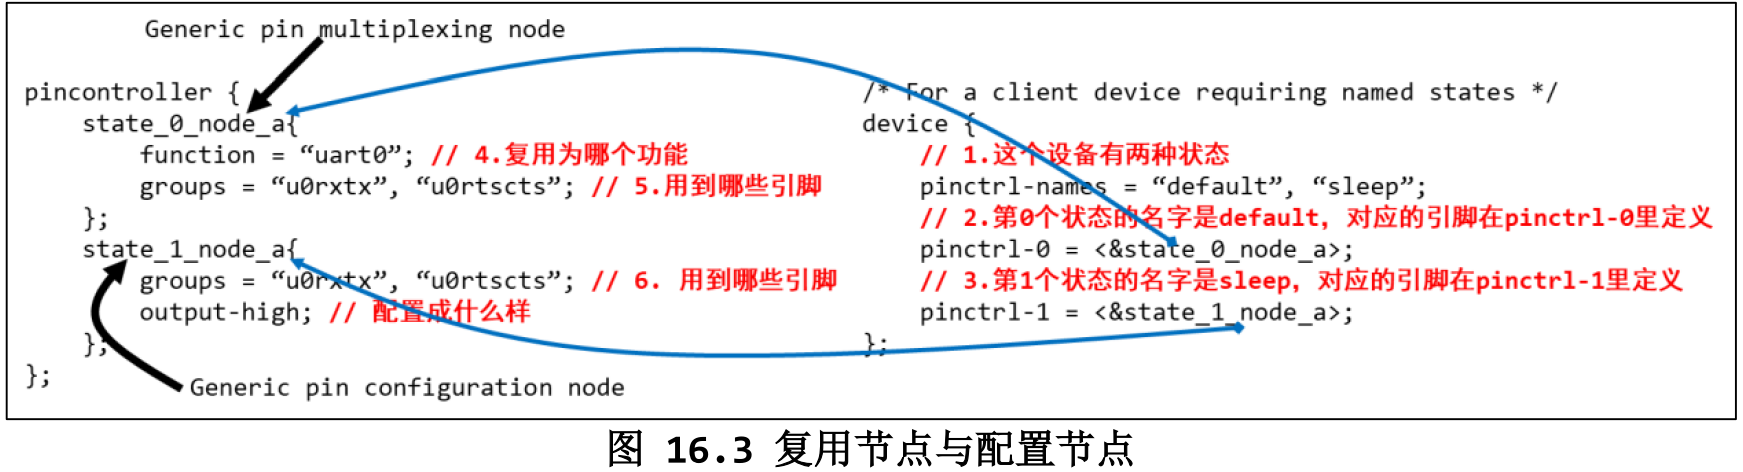
- pin state, 对于一个“client device”来说,比如对于一个 UART 设备,它有多个“状态”:default、sleep 等,那对应的引脚也有这些状态。
- groups 和 function:一个设备会用到一个或多个引脚,这些引脚就可以归为一组(group); 这些引脚可以复用为某个功能:function。
- Generic pin multiplexing node 和 Generic pin configuration node , 可 以 用 来 描 述 复 用 信 息 : 哪 组 (group) 引 脚 复 用 为 哪 个 功 能(function); 可以用来描述配置信息:哪组(group)引脚配置为哪个设置功能(setting),比如上拉、下拉等。pin controller 节点的格式,没有统一的标准!!!!每家芯片都不一样。 甚至上面的 group、function 关键字也不一定有,但是概念是有的。
16.1.4 代码中怎么引用 pinctrl
- 这是透明的,我们的驱动基本不用管。当设备切换状态时,对应的 pinctrl就会被调用。非要自己调用,也有函数:
devm_pinctrl_get_select_default(struct device *dev);      // 使用"default"状态的引脚
pinctrl_get_select(struct device *dev, const char *name); // 根据 name 选择某种状态的引脚
pinctrl_put(struct pinctrl *p);   // 不再使用, 退出时调用
16.2 GPIO 子系统重要概念
16.2.1 引入
- 在设备树里指定 GPIO 引脚
- 在驱动代码中:使用 GPIO 子系统的标准函数获得 GPIO、设置 GPIO 方向、读取/设置 GPIO 值。
16.2.2 在设备树中指定引脚
-
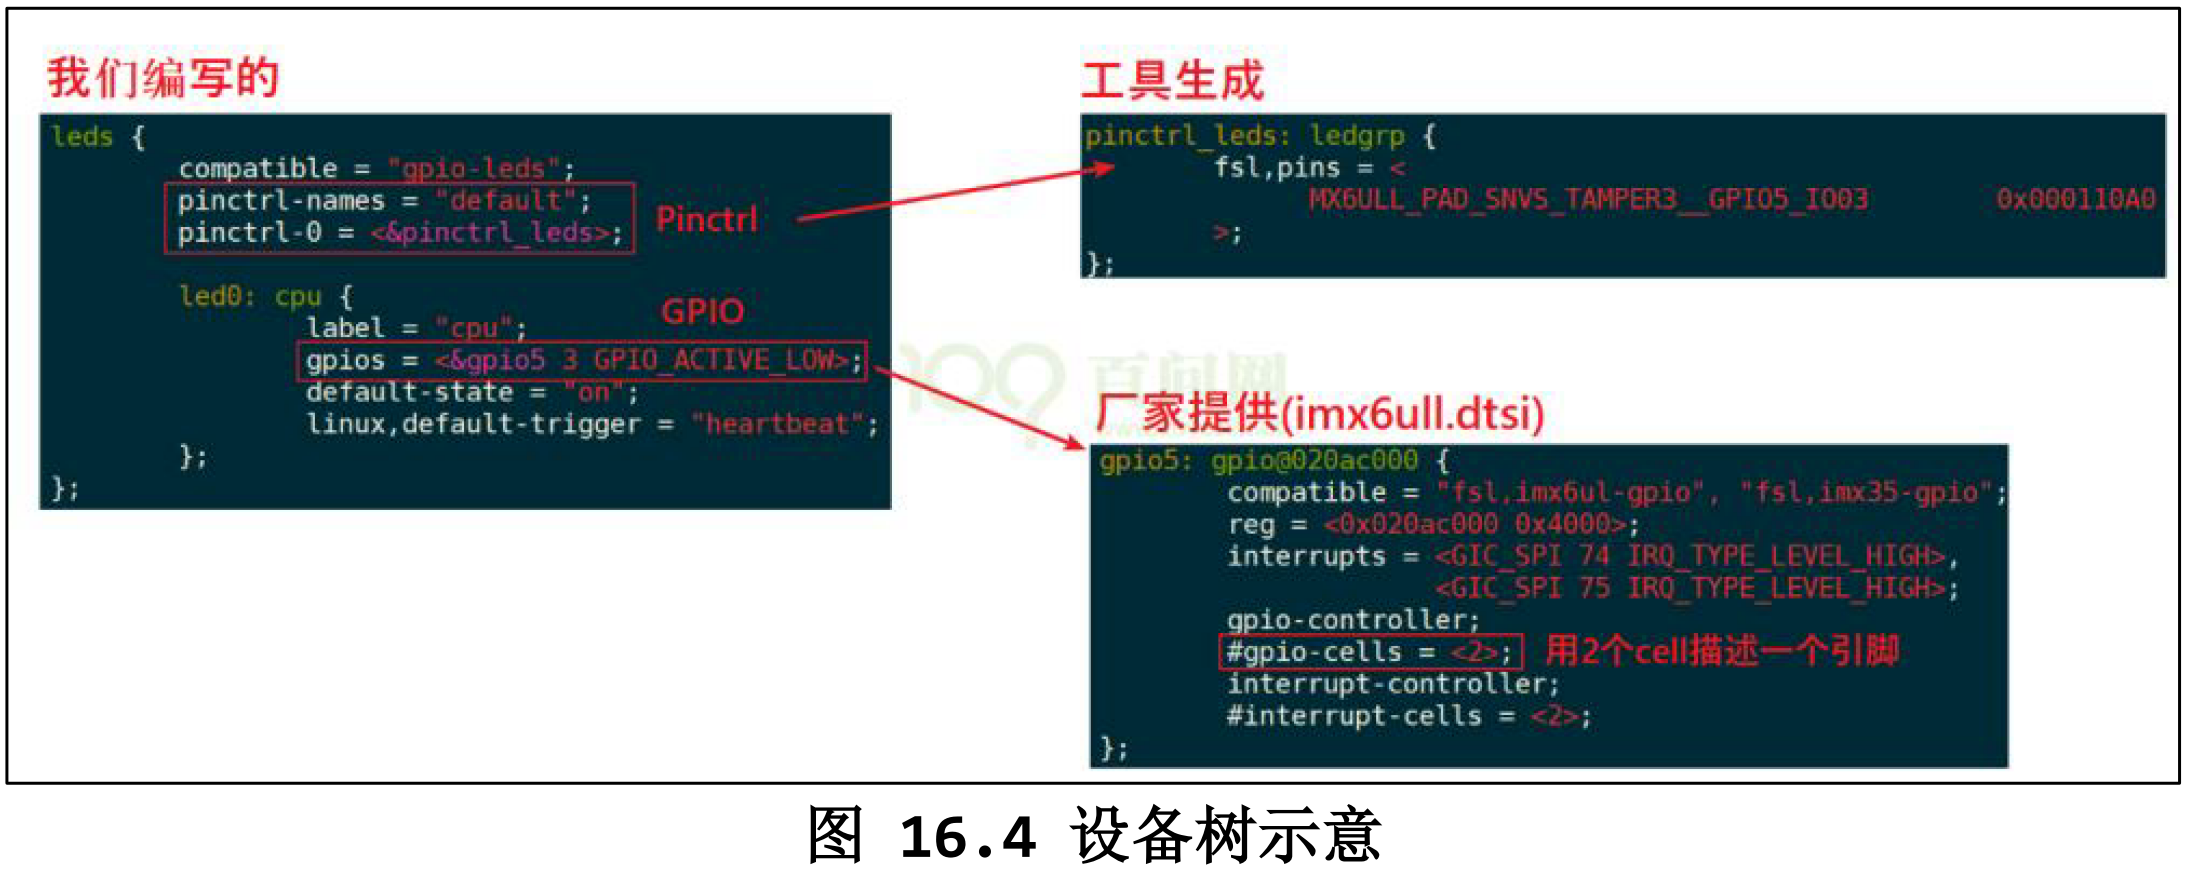
“GPIO 组”就是一个 GPIO Controller,这通常都由芯片厂家设置好。我们要做的是找到它名字,比如“gpio1”,然后指定要用它里面的哪个引脚,比如<&gpio1 0>。
dtsi定义,dts中使用。gpio1: gpio@0209c000 { compatible = "fsl,imx6ul-gpio", "fsl,imx35-gpio"; reg = <0x0209c000 0x4000>; interrupts = <GIC_SPI 66 IRQ_TYPE_LEVEL_HIGH>, <GIC_SPI 67 IRQ_TYPE_LEVEL_HIGH>; gpio-controller; #gpio-cells = <2>; interrupt-controller; #interrupt-cells = <2>; };&usdhc1 { pinctrl-names = "default"; pinctrl-0 = <&pinctrl_usdhc1>; cd-gpios = <&gpio1 19 GPIO_ACTIVE_LOW>; keep-power-in-suspend; enable-sdio-wakeup; bus-width = <4>; status = "okay"; }; - 我们暂时只需要关心里面的这 2 个属性, “gpio-controller” 表示这个节点是一个 GPIO Controller,它下面有很 多引脚。 “#gpio-cells = <2>” 表示这个控制器下每一个引脚要用 2 个 32 位的数(cell)来描述。普遍的用法是,用第 1 个 cell 来表示哪一个引脚,用第 2 个 cell 来表示有效电平
16.2.3 在驱动代码中调用 GPIO 子系统
GPIO 子系统有两套接口:基于描述符的(descriptor-based)、老的(legacy)。前者的函数都有前缀“gpiod_”,它使用 gpiodesc 结构体来表示一个引脚;后者的函数都有前缀“gpio”,它使用一个整数来表示一个引脚。
- 驱动程序中要包含头文件, gpiod 或 gpio
#include <linux/gpio/consumer.h> // descriptor-based #include <linux/gpio.h> // legacy -
常用函数 获得 GPIO
descriptor-based legacy gpiod_get gpio_request gpiod_get_index gpiod_get_array gpio_request_array devm_gpiod_get devm_gpiod_get_index devm_gpiod_get_array -
常用函数 设置方向
descriptor-based legacy gpiod_direction_input gpio_direction_input gpiod_direction_output gpio_direction_output -
常用函数 读值、写值
descriptor-based legacy gpiod_get_value gpio_get_value gpiod_set_value gpio_set_value -
常用函数 释放 GPIO
descriptor-based legacy gpio_free gpio_free gpiod_put gpio_free_array gpiod_put_array devm_gpiod_put devm_gpiod_put_array - 有前缀“devm”的含义是“设备资源管理”(Managed Device Resource),这是一种自动释放资源的机制。它的思想是“资源是属于设备的,设备不存在时资源就可以自动释放”。如果使用 devm 的相关函数,在内存申请失败时可以直接返回:设备的销毁函数会自动地释放已经申请了的 GPIO 资源。建议使用“devm”版本的相关函数。
- 使用下面的函数获得引脚例子
foo_device {
compatible = "acme,foo";
...
led-gpios = <&gpio 15 GPIO_ACTIVE_HIGH>, /* red */
      <&gpio 16 GPIO_ACTIVE_HIGH>, /* green */
      <&gpio 17 GPIO_ACTIVE_HIGH>; /* blue */
power-gpios = <&gpio 1 GPIO_ACTIVE_LOW>;
};
struct gpio_desc *red, *green, *blue, *power; // red = gpiod_get_index(dev, "led", 0, GPIOD_OUT_HIGH); green = gpiod_get_index(dev, "led", 1, GPIOD_OUT_HIGH); blue = gpiod_get_index(dev, "led", 2, GPIOD_OUT_HIGH); power = gpiod_get(dev, "power", GPIOD_OUT_HIGH);
注意:gpiod_set_value 设置的值是“逻辑值”,不一定等于物理值。如何设备树中设置为低电平使能,那么 gpiod_set_value(desc, 0) 会让实际的电平为高电平。
- 旧的“gpio_”函数没办法根据设备树信息获得引脚,它需要先知道引脚号。
16.2.4 sysfs 中的访问方法
在 sysfs 中访问 GPIO,实际上用的就是引脚号,老的方法。先确定某个 GPIO Controller 的基准引脚号(base number),再计算出某个引脚的号码。
- 先在开发板的
/sys/class/gpio目录下,找到各个 gpiochipXXX 目录 - 然后进入某个 gpiochip 目录,查看文件 label 的内容
- 根据 label 的内容对比设备树,比如
gpiochip96的 label 为20a800.gpio, 设备树中gpio4: gpio@20a800. 所以,通过20a800把 gpio4 和 96 联系起来,gpio4 的基准引脚号就是 96,可以通过 base 内容核对。 - GPIO4_14 的引脚号码是 96+14=110,相关操作是:
// 输入引脚
[root@100ask:~]# echo  110 > /sys/class/gpio/export
[root@100ask:~]# echo in > /sys/class/gpio/gpio110/direction
[root@100ask:~]# cat /sys/class/gpio/gpio110/value
[root@100ask:~]# echo  110 > /sys/class/gpio/unexport
// 输出引脚,假设引脚号为 N,可以用下面的方法设置它的值为 1: [root@100ask:~]# echo N > /sys/class/gpio/export [root@100ask:~]# echo out > /sys/class/gpio/gpioN/direction [root@100ask:~]# echo 1 > /sys/class/gpio/gpioN/value [root@100ask:~]# echo N > /sys/class/gpio/unexport
16.3 基于 GPIO 子系统的 LED 驱动程序
16.3.1 编写思路
16.3.3 在设备树中添加 GPIO 信息
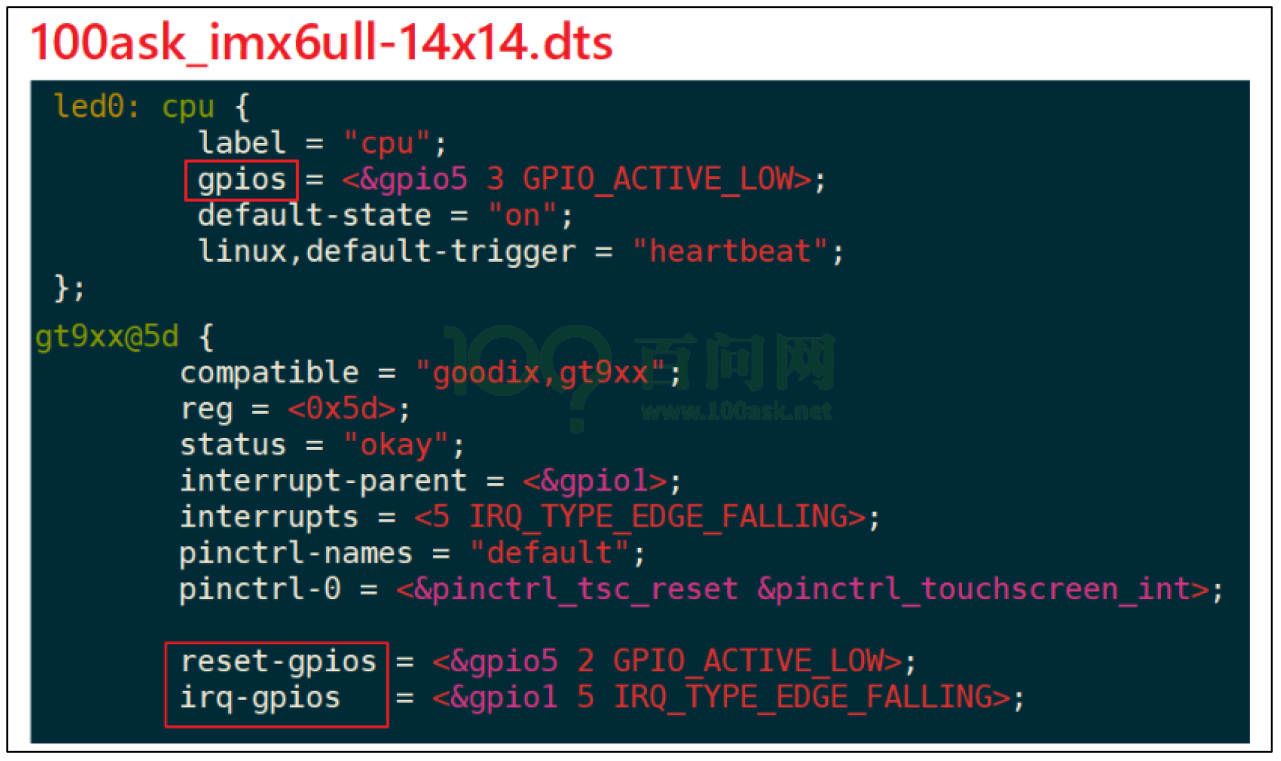
- 在设备树中指定:添加”[name]-gpios”属性,指定使用的是哪一个 GPIO Controller 里的哪一个引脚,还有其他 Flag 信息,比如 GPIO_ACTIVE_LOW 等。
- 具体需要多少个 cell 来描述一个引脚,需要查看设备树中这个 GPIO Controller 节点里的“#gpio-cells”属性值,也可以查看内核文档。
16.4 在 100ASK_IMX6ULL 上机实验
16.4.1 确定引脚并生成设备树节点
NXP 公司对于 IMX6ULL 芯片,有设备树生成工具。
- Pinctrl 信息:
&iomuxc_snvs { …… myled_for_gpio_subsys: myled_for_gpio_subsys{ fsl,pins = < MX6ULL_PAD_SNVS_TAMPER3__GPIO5_IO03 0x000110A0 >; }; - 设备节点信息(放在根节点下):
    myled {
        compatible = "100ask,leddrv";
        pinctrl-names = "default";
        pinctrl-0 = <&myled_for_gpio_subsys>;
        led-gpios = <&gpio5 3 GPIO_ACTIVE_LOW>;
    };
16.4.2 编译程序
/sys/firmware/devicetree/base/led_100ask这个和设备树中,新的设备节点名称对应led_100ask { compatible = "100ask,leddrv"; pinctrl-names = "default"; pinctrl-0 = <&gpio_leds_100ask>; led-gpios = <&gpio5 3 GPIO_ACTIVE_LOW>; };/sys/class/100ask_led_class/100ask_led0/sys/devices/soc0/led_100ask/sys/devices/soc0/led_100ask/driver/sys/devices/soc0/led_100ask/driver/led_100ask/of_node
第18章 Linux 系统对中断的处理
18.2 Linux 系统对中断处理的演进
Linux 系统中有硬件中断,也有软件中断。对硬件中断的处理有 2 个原则:不能嵌套,越快越好。
18.2.1 Linux 对中断的扩展:硬件中断、软件中断
// include\linux\interrupt.h
enum
{
    HI_SOFTIRQ=0,
    TIMER_SOFTIRQ,
    NET_TX_SOFTIRQ,
    NET_RX_SOFTIRQ,
    BLOCK_SOFTIRQ,
    IRQ_POLL_SOFTIRQ,
    TASKLET_SOFTIRQ,
    SCHED_SOFTIRQ,
    HRTIMER_SOFTIRQ, /* Unused, but kept as tools rely on the numbering. Sigh! */
    RCU_SOFTIRQ,    /* Preferable RCU should always be the last softirq */
    NR_SOFTIRQS
};- 触发软件中断
void raise_softirq(unsigned int nr); - 设置软件中断的处理函数
void open_softirq(int nr, void (*action)(struct softirq_action *));
18.2.4 要处理的事情实在太多,拆分为:上半部、下半部
- 在 handler 函数里只做紧急的事,然后就重新开中断,让系统得以正常运行;那些不紧急的事,以后再处理,处理时是开中断的。
- 中断下半部的实现有很多种方法,讲 2 种主要的:tasklet(小任务)、work queue(工作队列)。
18.2.5 下半部要做的事情耗时不是太长:tasklet


- 硬件中断 A 处理过程中,没有其他中断发生:上述流程图①~⑨依次执行,上半部、下半部的代码各执行一次。
- 硬件中断 A 处理过程中,又再次发生了中断 A:同一个中断的上半部、下半部,在执行时是多对一的关系。
- 硬件中断 A 处理过程中,又再次发生了中断 B:多个中断的下半部,是汇集在一起处理的。
总结:
- 中断上半部,用来处理紧急的事,它是在关中断的状态下执行的
- 中断下半部,用来处理耗时的、不那么紧急的事,它是在开中断的状态下执行的
- 中断下半部执行时,有可能会被多次打断,有可能会再次发生同一个中断
- 中断上半部执行完后,触发中断下半部的处理
- 中断上半部、下半部的执行过程中,不能休眠
18.2.6 下半部要做的事情太多并且很复杂:工作队列
如果中断要做的事情实在太耗时,那就不能用软件中断来做,而应该用内核线程来做:在中断上半部唤醒内核线程。内核线程和 APP 都一样竞争执行,APP 有机会执行,系统不会卡顿。 这个内核线程是系统帮我们创建的,一般是 kworker 线程,内核中有很多这样的线程, 使用 ps -A | grep kworker 可以查看。kworker 线程要去“工作队列”(work queue)上取出一个一个“工作”(work),来执行它里面的函数。
- 创建 work:
static DECLARE_WORK(pmac_backlight_key_work, pmac_backlight_key_worker);类似这样,前面是结构体,后面是函数 - 把 work 提交给 work queue ,
schedule_work(&pmac_backlight_key_work);会把 work 提供给系统默认的 work queue:system_wq,它是一个队列。 - schedule_work 函数不仅仅是把 work 放入队列,还会把kworker 线程唤醒。此线程抢到时间运行时,它就会从队列中取出 work,执行里面的函数。
- 在中断场景中,可以在中断上半部调用 schedule_work 函数。
总结:
- 很耗时的中断处理,应该放到线程里去
- 可以使用 work、work queue
- 在中断上半部调用 schedule_work 函数,触发 work 的处理
- 既然是在线程中运行,那对应的函数可以休眠。
18.2.7 新技术:threaded irq
你可以只提供 thread_fn,系统会为这个函数创建一个内核线程。发生中断时,内核线程就会执行这个函数。
int request_threaded_irq(unsigned int irq, irq_handler_t handler, irq_handler_t thread_fn, unsigned long irqflags, const char *devname, void *dev_id) , handler 是上半部,thread_fn 是下半部。
- 用 work 来线程化地处理中断,一个 worker 线程只能由一个 CPU 执行,多个中断的 work 都由同一个 worker 线程来处理,在单 CPU 系统中也只能忍着了。但是在 SMP 系统中,明明有那么多 CPU 空着,你偏偏让多个中断挤在这个CPU 上?
- threaded irq,为每一个中断都创建一个内核线程;多个中断的内核线程可以分配到多个 CPU 上执行,这提高了效率。
18.3 Linux 中断系统中的重要数据结构
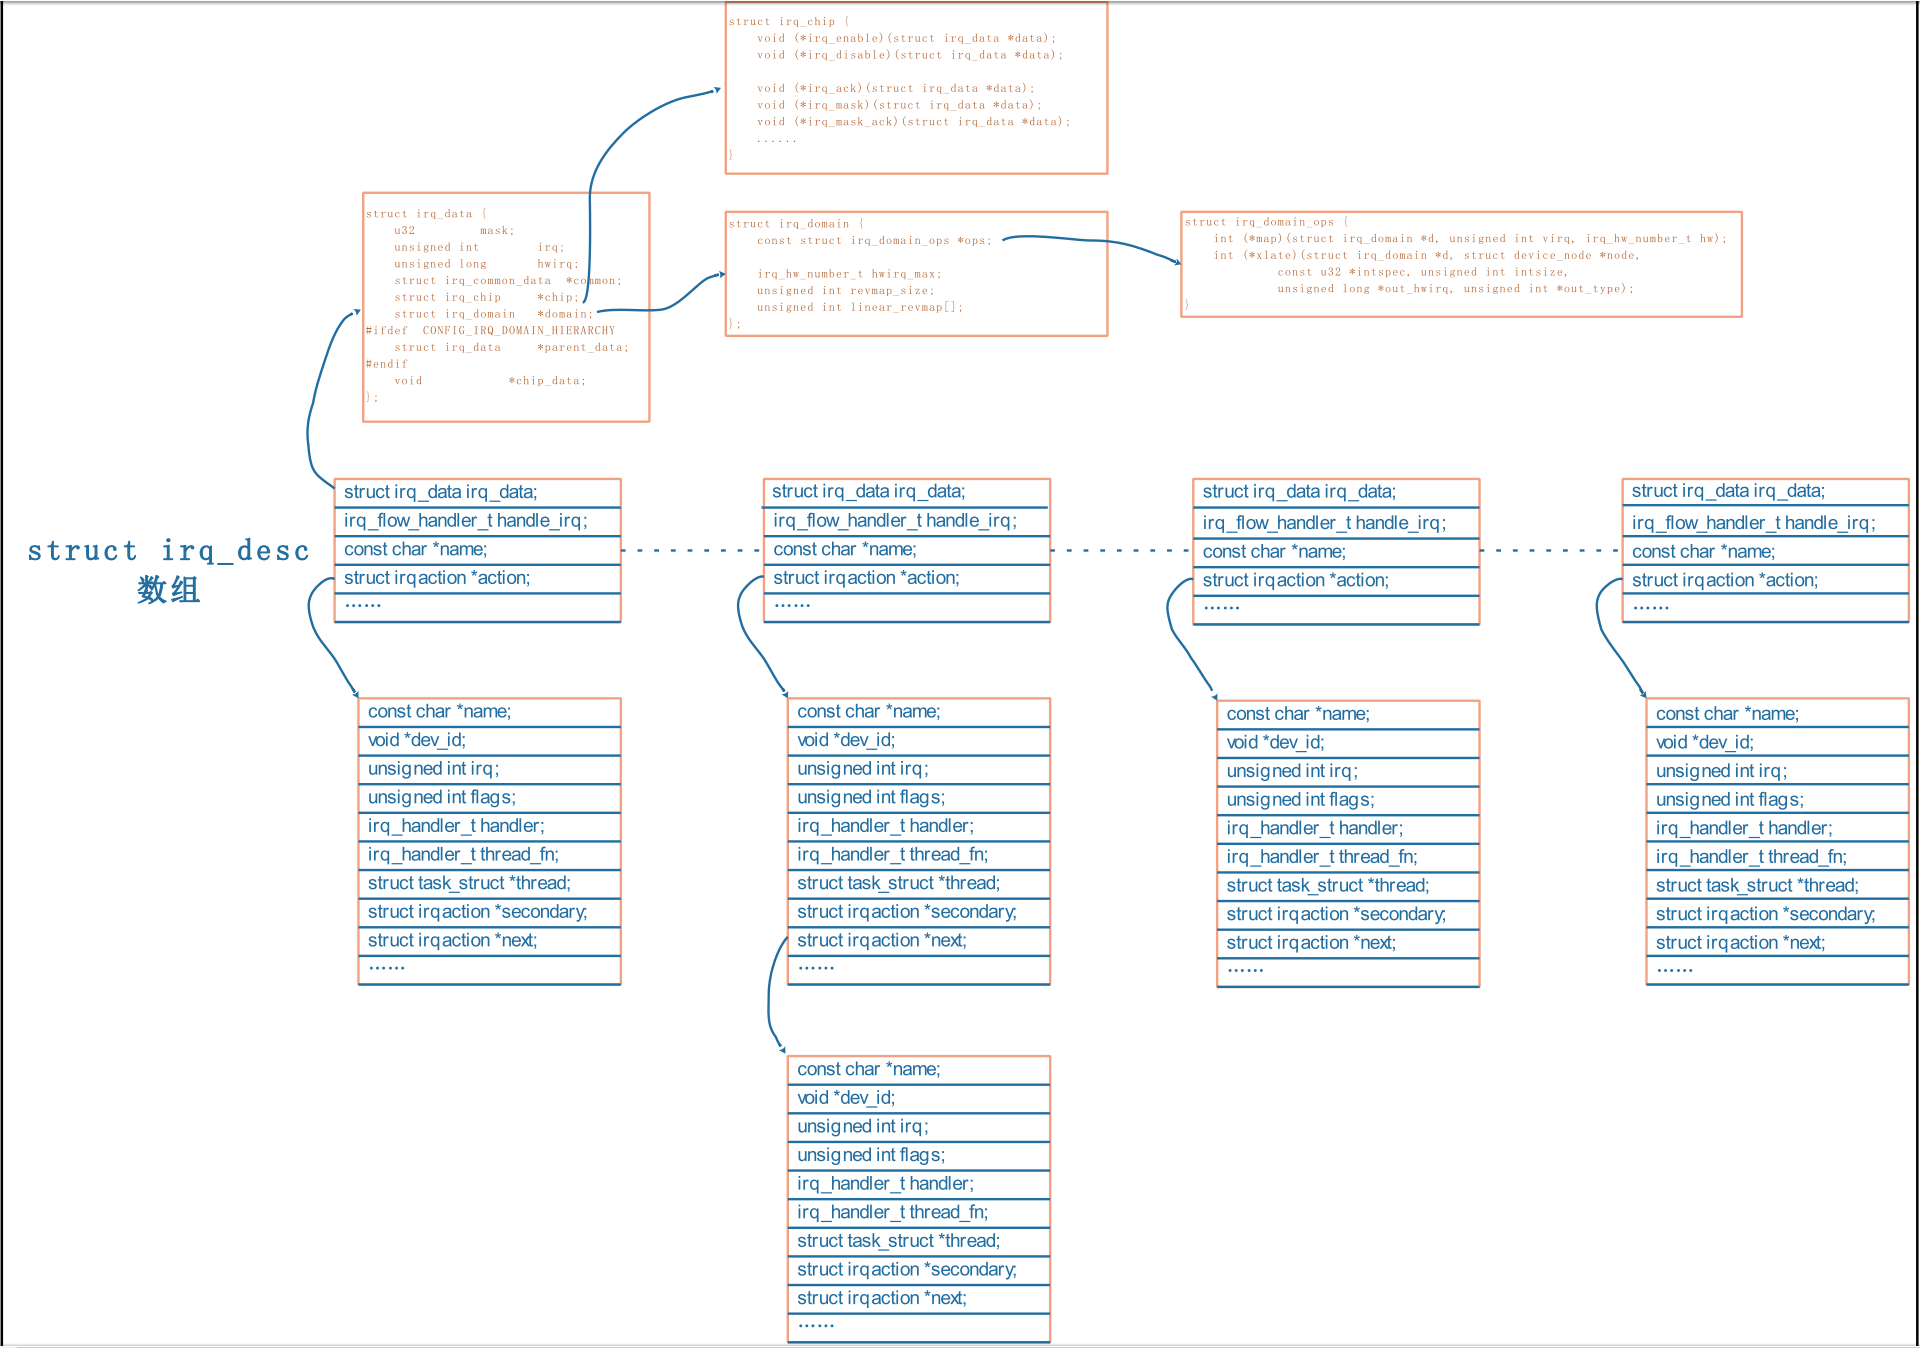
最核心的结构体是 irq_desc,之前为了易于理解,我们说在 Linux 内核中有一个中断数组,对于每一个硬件中断,都有一个数组项,这个数组就是irq_desc 数组。 如果内核配置了 CONFIG_SPARSE_IRQ,那么它就会用基数树(radix tree) 来代替 irq_desc 数组。
18.3.1 irq_desc 数组
- irq_desc 结构体在 include/linux/irqdesc.h 中定义
struct irq_desc { ... struct irq_data irq_data; ... irq_flow_handler_t handle_irq; ... struct irqaction *action; /* IRQ action list */ ... const char *name; } ____cacheline_internodealigned_in_smp; -
每一个 irq_desc 数组项中都有一个函数:handle_irq,还有一个 action 链表。 外部设备 1、外部设备 n 共享一个 GPIO 中断 B,多个 GPIO 中断汇聚到GIC(通用中断控制器)的 A 号中断,GIC 再去中断 CPU。那么软件处理时就是反 过来,先读取 GIC 获得中断号 A,再细分出 GPIO 中断 B,最后判断是哪一个外部芯片发生了中断。
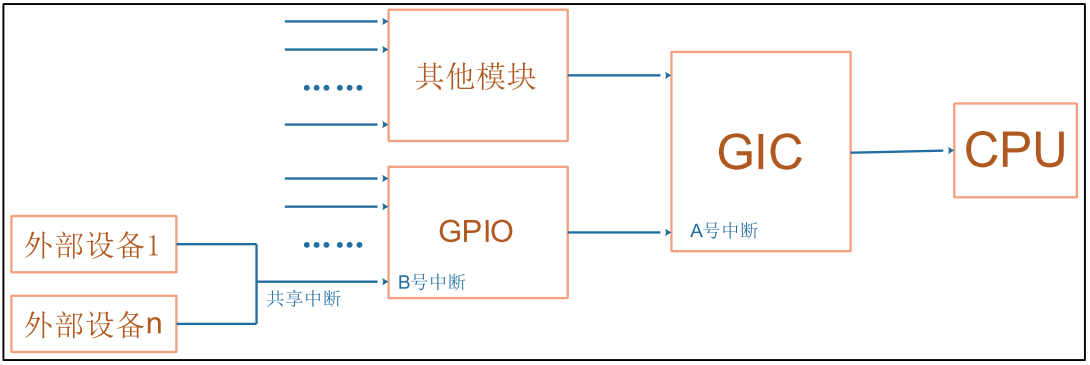
- GIC 的处理函数:假设 irq_desc[A].handle_irq 是 XXX_gpio_irq_handler(XXX 指厂家),这个函数需要读取芯片的 GPIO 控制器,细分发生的是哪一个 GPIO 中断(假设是B),再去调用 irq_desc[B]. handle_irq。
- 模块的中断处理函数: 对 于 GPIO 模 块 向 GIC 发 出 的 中 断 B , 它 的 处 理 函 数 irq_desc[B].handle_irq。 导致 GPIO 中断 B 发生的原因很多,所以 irq_desc[B].handle_irq 会调用某个链表里的函数,这些函数由外部设备提供。这些函数自行判断该中断是否自己产生,若是则处理。
- 外部设备提供的处理函数:处理函数由自己驱动程序提供,对于共享中断,比如 GPIO 中断 B,它的中断来源可能有多个,每个中断源对应一个中断处理函数。所以 irq_desc[B]中应该有一个链表,存放着多个中断源的处理函数。 一旦程序确定发生了 GPIO 中断 B,那么就会从链表里把那些函数取出来,一一执行。这个链表就是 action 链表。
18.3.2 irqaction 结构体
irqaction 结构体在 include/linux/interrupt.h 中定义
struct irqaction {
    irq_handler_t       handler;
    void            *dev_id;
    ...
    struct irqaction    *next;
    irq_handler_t       thread_fn;
    struct task_struct  *thread;
    struct irqaction    *secondary;
    unsigned int        irq;
    unsigned int        flags;
    ...
    const char      *name;
    ...
} ____cacheline_internodealigned_in_smp;
当调用 request_irq、request_threaded_irq 注册中断处理函数时,内核就会构造一个 irqaction 结构体。在里面保存 name、dev_id 等,最重要的是 handler、thread_fn、thread。 handler 是中断处理的上半部函数,用来处理紧急的事情。thread_fn 对应一个内核线程 thread,当 handler 执行完毕,Linux 内核会唤醒对应的内核线程。在内核线程里,会调用 thread_fn 函数。
- 可以提供 handler 而不提供 thread_fn,就退化为一般的 request_irq 函数。
- 可以不提供 handler 只提供 thread_fn,完全由内核线程来处理中断。
- 也可以既提供 handler 也提供 thread_fn,这就是中断上半部、下半部。
在 reqeust_irq 时可以传入 dev_id,在共享中断中必须提供 dev_id,非共享中断可以不提供。
- 中断处理函数执行时,可以使用 dev_id
- 卸载中断时要传入 dev_id,这样才能在 action 链表中根据 dev_id 找到对应项
18.3.3 irq_data 结构体
irq_data 结构体在 include/linux/irq.h 中定义
struct irq_data {
    u32         mask;
    unsigned int        irq;
    unsigned long       hwirq;
    struct irq_common_data  *common;
    struct irq_chip     *chip;
    struct irq_domain   *domain;
#ifdef  CONFIG_IRQ_DOMAIN_HIERARCHY
    struct irq_data     *parent_data;
#endif
    void            *chip_data;
};
它就是个中转站,里面有 irq_chip 指针 irq_domain 指针,都是指向别的结构体。 irq 是软件中断号,hwirq 是硬件中断号。 联系由 irq_domain 来建立。irq_domain会把本地的 hwirq 映射为全局的 irq,
18.3.4 irq_domain 结构体
irq_domain 结构体在 include/linux/irqdomain.h 中定义,
struct irq_domain {
    struct list_head link;
    const char *name;
    const struct irq_domain_ops *ops;
    void *host_data;
    unsigned int flags;
    /* Optional data */
    struct fwnode_handle *fwnode;
    enum irq_domain_bus_token bus_token;
    struct irq_domain_chip_generic *gc;
#ifdef  CONFIG_IRQ_DOMAIN_HIERARCHY
    struct irq_domain *parent;
#endif
    /* reverse map data. The linear map gets appended to the irq_domain */
    irq_hw_number_t hwirq_max;
    unsigned int revmap_direct_max_irq;
    unsigned int revmap_size;
    struct radix_tree_root revmap_tree;
    unsigned int linear_revmap[];
};
interrupt-parent = <&gpio1>;
interrupts = <5 IRQ_TYPE_EDGE_RISING>; 表示要使用 gpio1 里的第 5 号中断,hwirq 就是 5。但是我们在驱动中会使用 request_irq(irq, handler)这样的函数来注册中断,irq 是什么?它是软件中断号,它应该从“gpio1 的第 5 号中断”转换得来。 irq_domain 结构体中有一个 irq_domain_ops 结构体,里面有各种操作函数,主要是:
- xlate 用来解析设备树的中断属性,提取出 hwirq、type 等信息。
- map 把 hwirq 转换为 irq。
18.3.5 irq_chip 结构体
irq_chip 结构体在 include/linux/irq.h 中定义
struct irq_chip {
    ...
    void        (*irq_enable)(struct irq_data *data);
    void        (*irq_disable)(struct irq_data *data);
    void        (*irq_ack)(struct irq_data *data);
    void        (*irq_mask)(struct irq_data *data);
    void        (*irq_mask_ack)(struct irq_data *data);
    ...
};- 我们在 request_irq 后,并不需要手工去使能中断,原因就是系统调用对应的 irq_chip 里的函数帮我们使能了中断。
- 我们提供的中断处理函数中,也不需要执行主芯片相关的清中断操作,也是系统帮我们调用 irq_chip 中的相关函数。
- 但是对于外部设备相关的清中断操作,还是需要我们自己做的。
18.4 在设备树中指定中断_在代码中获得中断
18.4.1 设备树里中断节点的语法
内核 Documentation\devicetree\bindings\interrupt-controller\interrupts.txt
设备树里的中断控制器
- 在设备树中,中断控制器节点中必须有一个属性:interrupt-controller,表明它是“中断控制器”。
- 还必须有一个属性:#interrupt-cells,表明引用这个中断控制器的话需要多少个 cell。
#interrupt-cells=<1>别的节点要使用这个中断控制器时,只需要一个 cell 来表明使用“哪一个中断”。#interrupt-cells=<2>别的节点要使用这个中断控制器时,需要一个 cell 来表明使用“哪一个中断”; 还需要另一个 cell 来描述中断,一般是表明触发类型:第 2 个 cell 的 bits[3:0] 用来表示中断触发类型(trigger type and level flags): 1 = low-to-high edge triggered,上升沿触发 2 = high-to-low edge triggered,下降沿触发 4 = active high level-sensitive,高电平触发 8 = active low level-sensitive,低电平触发- 如 果 中 断 控 制 器 有 级 联 关 系 , 下 级 的 中 断 控 制 器 还 需 要 表 明 它 的“ interrupt-parent ” 是 谁 , 用 了 interrupt-parent ” 中 的 哪 一 个“interrupts”,
设备树里使用中断
interrupt-parent=<&XXXX>你要用哪一个中断控制器里的中断?interrupts你要用哪一个中断?Interrupts 里要用几个 cell,由 interrupt-parent 对应的中断控制器决定。i2c@7000c000 { gpioext: gpio-adnp@41 { compatible = "ad,gpio-adnp"; // interrupt-parent = <&gpio>; interrupts = <160 1>; // gpio-controller; #gpio-cells = <1>; // interrupt-controller; #interrupt-cells = <2>; }; ...... };- 新写法:interrupts-extended, 一个“interrupts-extended”属性就可以既指定“interrupt-parent”,也指定“interrupts”,
interrupts-extended = <&intc1 5 1>, <&intc2 1 0>;
18.4.3 在代码中获得中断
- 对于 platform_device,
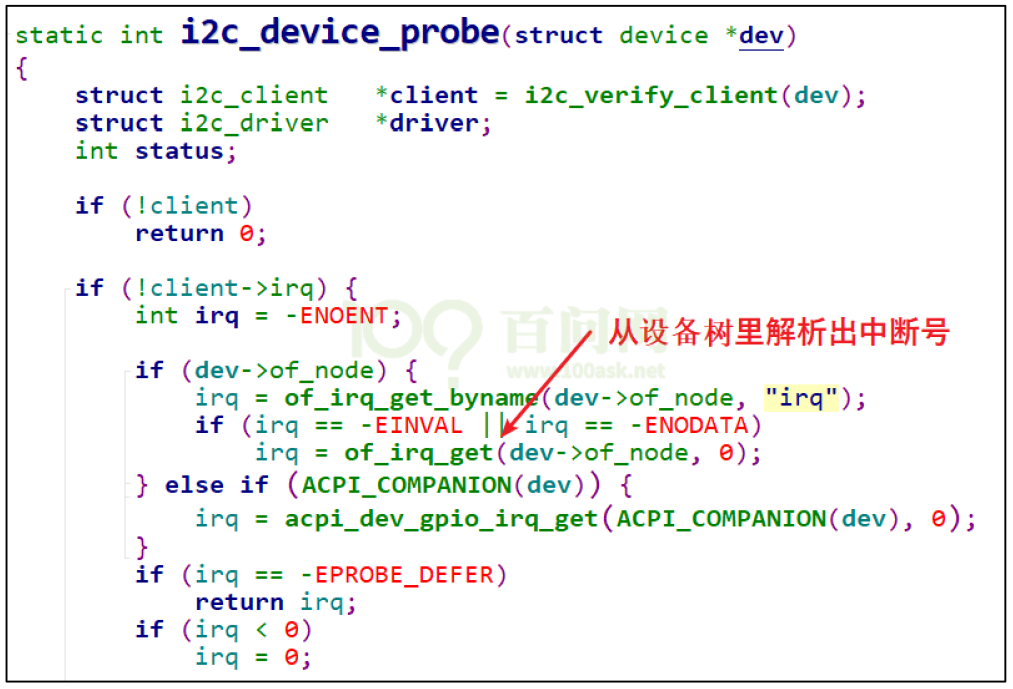
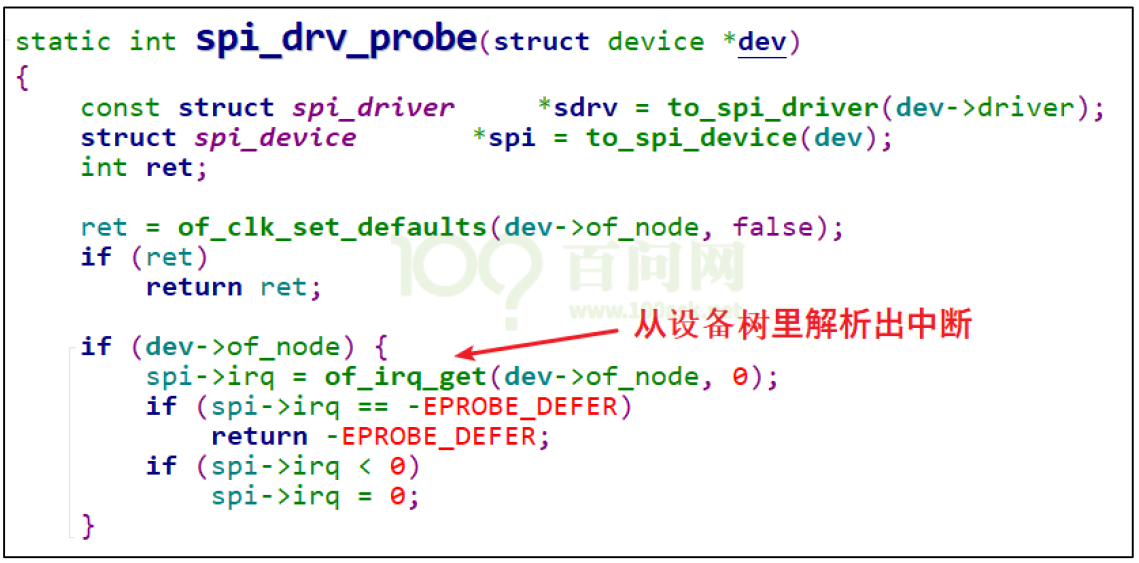
/** * platform_get_resource - get a resource for a device * @dev: platform device * @type: resource type // 取哪类资源?IORESOURCE_MEM、IORESOURCE_REG * // IORESOURCE_IRQ 等 * @num: resource index // 这类资源中的哪一个? */ struct resource *platform_get_resource(struct platform_device *dev, unsigned int type, unsigned int num); - 对于 I2C 设备、SPI 设备. I2C 总线驱动在处理设备树里的 I2C 子节点时,也会处理其中的中断信息。一个 I2C 设备会被转换为一个 i2c_client 结构体,中断号会保存在 i2c_client 的 irq 成员里,代码如下(drivers/i2c/i2c-core.c). 对于 SPI 设备节点,SPI 总线驱动在处理设备树里的 SPI 子节点时,也会处理其中的中断信息。一个 SPI 设备会被转换为一个 spi_device 结构体,中断号会保存在 spi_device 的 irq 成员里,代码如下(drivers/spi/spi.c).
- 调用 of_irq_get 获得中断号, 如果你的设备节点既不能转换为 platform_device,它也不是 I2C 设备,不是 SPI 设备,那么在驱动程序中可以自行调用 of_irq_get 函数去解析设备树,得到中断号。
- 对于 GPIO, 参考:drivers/input/keyboard/gpio_keys.c 可以使用 gpio_to_irq 或 gpiod_to_irq 获得中断号。
gpio-keys {
compatible = "gpio-keys";
pinctrl-names = "default";
user {
    label = "User Button";
    gpios = <&gpio5 1 GPIO_ACTIVE_HIGH>;
    gpio-key,wakeup;
    linux,code = <KEY_1>;
};
};
// 可以使用下面的函数获得引脚和 flag button->gpio = of_get_gpio_flags(pp, 0, &flags); bdata->gpiod = gpio_to_desc(button->gpio); // 再去使用 gpiod_to_irq 获得中断号: irq = gpiod_to_irq(bdata->gpiod);
18.5 编写使用中断的按键驱动程序
对于 GPIO 按键,我们并不需要去写驱动程序,使用内核自带的驱动程序 drivers/input/keyboard/gpio_keys.c 就可以,然后你需要做的只是修改设备树指定引脚及键值。
当然,也可以从头写按键驱动,特别是如何使用中断。
18.5.2 先编写驱动程序
- 使用自定义结构体来保存 gpio 数据
struct gpio_key{ int gpio; struct gpio_desc *gpiod; int flag; int irq; } ; - 从设备树获得 GPIO
count = of_gpio_count(node); - 申请自定义 gpio 结构体内存
gpio_keys_100ask = kzalloc(sizeof(struct gpio_key) * count, GFP_KERNEL); - 获取 gpio 号和 flag,
gpio_keys_100ask[i].gpio = of_get_gpio_flags(node, i, &flag); - 从 GPIO 获得中断号
gpio_keys_100ask[i].irq = gpio_to_irq(gpio_keys_100ask[i].gpio); - 准备申请中断的 flag
gpio_keys_100ask[i].flag = flag & OF_GPIO_ACTIVE_LOW; if (flag & OF_GPIO_ACTIVE_LOW) flags |= GPIOF_ACTIVE_LOW; - 申请 gpio 资源
err = devm_gpio_request_one(&pdev->dev, gpio_keys_100ask[i].gpio, flags, NULL); - 保存 irq
gpio_keys_100ask[i].irq = gpio_to_irq(gpio_keys_100ask[i].gpio); - 申请中断, 并提供中断函数的参数 `err = request_irq(gpio_keys_100ask[i].irq, gpio_key_isr, IRQF_TRIGGER_RISING | IRQF_TRIGGER_FALLING, "100ask_gpio_key", &gpio_keys_100ask[i]);
- 中断函数
static irqreturn_t gpio_key_isr(int irq, void *dev_id) { struct gpio_key *gpio_key = dev_id; int val; val = gpiod_get_value(gpio_key->gpiod); printk("key %d %d\n", gpio_key->gpio, val); return IRQ_HANDLED; } - remove 的时候,别忘了
free_irq(gpio_keys_100ask[i].irq, &gpio_keys_100ask[i]);kfree(gpio_keys_100ask);
第19章 驱动程序基石
19.1 休眠与唤醒
19.1.2 内核函数
-
休眠函数 参考内核源码:include\linux\wait.h , wq:waitqueue,等待队列, 休眠时除了把程序状态改为非 RUNNING 之外,还要把进程/进程放入 wq 中,以后中断服务程序要从 wq 中把它取出来唤醒。condition 这可以是一个变量,也可以是任何表达式。表示“一直等待,直到 condition 为真”。
函数 说明 wait_event_interruptible(wq, condition) 休眠,直到 condition 为真; 休眠期间是可被打断的,可以被信号打断 wait_event(wq, condition) 休眠,直到 condition 为真; 退出的唯一条件是 condition 为真,信号也不好使 wait_event_interruptible_timeout(wq, condition, timeout) 休眠,直到 condition 为真或超时; 休眠期间是可被打断的,可以被信号打断 wait_event_timeout(wq, condition, timeout) 休眠,直到 condition 为真; 退出的唯一条件是 condition 为真,信号也不好使 -
唤醒函数 参考内核源码:include\linux\wait.h。
函数 说明 wake_up_interruptible(x) 唤醒 x 队列中状态为“TASK_INTERRUPTIBLE”的线程,只唤醒其中的一个线程 wake_up_interruptible_nr(x, nr) 唤醒 x 队列中状态为“TASK_INTERRUPTIBLE”的线程,只唤醒其中的 nr 个线程 wake_up_interruptible_all(x) 唤醒 x 队列中状态为“TASK_INTERRUPTIBLE”的线程,唤醒其中的所有线程 wake_up(x) 唤 醒 x 队 列 中 状 态 为 “ TASK_INTERRUPTIBLE ” 或“TASK_UNINTERRUPTIBLE”的线程,只唤醒其中的一个线程 wake_up_nr(x, nr) 唤 醒 x 队 列 中 状 态 为 “ TASK_INTERRUPTIBLE ” 或“TASK_UNINTERRUPTIBLE”的线程,只唤醒其中 nr 个线程 wake_up_all(x) 唤 醒 x 队 列 中 状 态 为 “ TASK_INTERRUPTIBLE ” 或“TASK_UNINTERRUPTIBLE”的线程,唤醒其中的所有线程
19.1.3 驱动框架
- 初始化 wq 队列
- 在驱动的 read 函数中,调用 wait_event_interruptible: 它本身会判断 event 是否为 FALSE,如果为 FASLE 表示无数据,则休眠。
- 在中断服务程序里: 设置 event 为 TRUE,并调用 wake_up_interruptible 唤醒线程。
19.1.4 编程
static DECLARE_WAIT_QUEUE_HEAD(gpio_key_wait);static ssize_t gpio_key_drv_read (struct file *file, char __user *buf, size_t size, loff_t *offset)
{
int err;
wait_event_interruptible(gpio_key_wait, g_key);
err = copy_to_user(buf, &g_key, 4);
g_key = 0;
return 4;
}static irqreturn_t gpio_key_isr(int irq, void *dev_id)
{
struct gpio_key *gpio_key = dev_id;
int val;
val = gpiod_get_value(gpio_key->gpiod);
printk("key %d %d\n", gpio_key->gpio, val);
g_key = (gpio_key->gpio << 8) | val;
wake_up_interruptible(&gpio_key_wait);
return IRQ_HANDLED;
}19.1.6 使用环形缓冲区改进驱动程序
/* 环形缓冲区 */
#define BUF_LEN 128
static int g_keys[BUF_LEN];
static int r, w;

#define NEXT_POS(x) ((x+1) % BUF_LEN)

static int is_key_buf_empty(void)
{
    return (r == w);
}

static int is_key_buf_full(void)
{
    return (r == NEXT_POS(w));
}

static void put_key(int key)
{
    if (!is_key_buf_full())
    {
        g_keys[w] = key;
        w = NEXT_POS(w);
    }
}

static int get_key(void)
{
    int key = 0;
    if (!is_key_buf_empty())
    {
        key = g_keys[r];
        r = NEXT_POS(r);
    }
    return key;
}
wait_event_interruptible(gpio_key_wait, !is_key_buf_empty());
key = get_key(); put_key(key);19.2 POLL 机制
- drv_poll 要把线程挂入队列 wq,但是并不是在 drv_poll 中进入休眠,而是在调用 drv_poll 之后休眠
19.2.3 驱动编程
- 把当前线程挂入队列 wq:poll_wait 把线程挂入队列,如果线程已经在队列里了,它就不会再次挂入。
- 返回设备状态:drv_poll 要返回自己的当前状态:(POLLIN | POLLRDNORM) 或 (POLLOUT | POLLWRNORM)。 POLLRDNORM 等同于 POLLIN, POLLWRNORM 等同于 POLLOUT
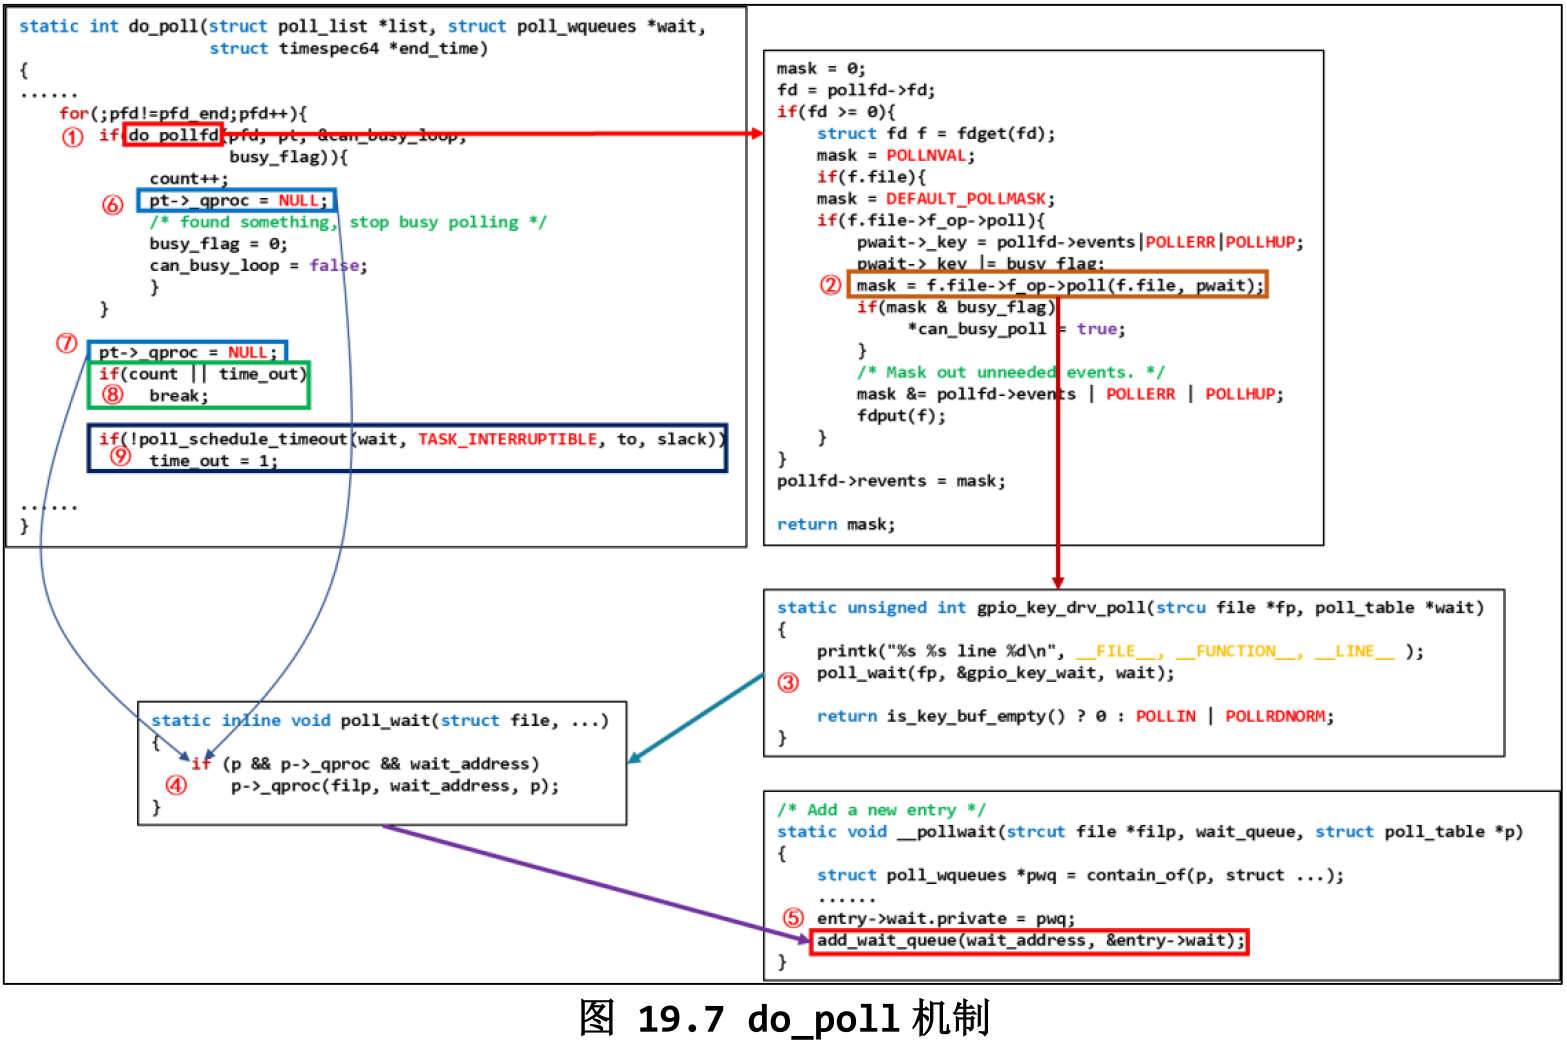
static unsigned int gpio_key_drv_poll(struct file *fp, poll_table * wait)
{
printk("%s %s line %d\n", __FILE__, __FUNCTION__, __LINE__);
poll_wait(fp, &gpio_key_wait, wait);
return is_key_buf_empty() ? 0 : POLLIN | POLLRDNORM;
}
19.2.7 POLL 机制的内核代码详解
对于系统调用 poll 或 select,它们对应的内核函数都是 sys_poll。分析sys_poll,即可理解 poll 机制。 都在 fs/select.c 文件中。
sys_poll -> do_sys_poll -> do_poll
19.3 异步通知
Linux 系统中也有很多信号,在 Linux 内核源文件 include\uapi\asm-generic\signal.h 中,有很多信号的宏定义:
#define SIGHUP       1
#define SIGINT       2
#define SIGQUIT      3
#define SIGILL       4
#define SIGTRAP      5
#define SIGABRT      6
#define SIGIOT       6
#define SIGBUS       7
#define SIGFPE       8
#define SIGKILL      9
#define SIGUSR1     10
#define SIGSEGV     11
#define SIGUSR2     12
#define SIGPIPE     13
#define SIGALRM     14
#define SIGTERM     15
#define SIGSTKFLT   16
#define SIGCHLD     17
#define SIGCONT     18
#define SIGSTOP     19
#define SIGTSTP     20
#define SIGTTIN     21
#define SIGTTOU     22
#define SIGURG      23
#define SIGXCPU     24
#define SIGXFSZ     25
#define SIGVTALRM   26
#define SIGPROF     27
#define SIGWINCH    28
#define SIGIO       29
#define SIGPOLL     SIGIO
...
设置 Flag 里面的 FASYNC 位为 1:当 FASYNC 位发生变化时,会导致驱动程序的 fasync 被调用;
19.3.3 驱动编程
struct fasync_struct *button_fasync;
static int gpio_key_drv_fasync(int fd, struct file *file, int on)
{
    if (fasync_helper(fd, file, on, &button_fasync) >= 0)
        return 0;
    else
        return -EIO;
}

static irqreturn_t gpio_key_isr(int irq, void *dev_id)
{
    struct gpio_key *gpio_key = dev_id;
    int val;
    int key;

    val = gpiod_get_value(gpio_key->gpiod);

    printk("key %d %d\n", gpio_key->gpio, val);
    key = (gpio_key->gpio << 8) | val;
    put_key(key);
    wake_up_interruptible(&gpio_key_wait);
    kill_fasync(&button_fasync, SIGIO, POLL_IN);

    return IRQ_HANDLED;
}
fasync_helper 函 数 会 分 配 、 构 造 一 个 fasync_struct 结 构 体 button_async:
- 驱动文件的 flag 被设置为 FAYNC 时:button_async->fa_file = filp; // filp 表示驱动程序文件,里面含有之前设置的 PID
- 驱动文件被设置为非 FASYNC 时: button_async->fa_file = NULL;
19.4 阻塞与非阻塞
O_NONBLOCK
19.4.1 应用编程
int  fd = open(“/dev/xxx”, O_RDWR | O_NONBLOCK);  /* 非阻塞方式 */
int  fd = open(“/dev/xxx”, O_RDWR );  /* 阻塞方式 */
int flags = fcntl(fd, F_GETFL);
fcntl(fd, F_SETFL, flags | O_NONBLOCK); /* 非阻塞方式 */
fcntl(fd, F_SETFL, flags & ~O_NONBLOCK); /* 阻塞方式 */ 19.4.2 驱动编程
// drv_read
    if (is_key_buf_empty() && (file->f_flags & O_NONBLOCK))
        return -EAGAIN;
19.5 定时器
参 考 内 核 源 码 include\linux\timer.h
- setup_timer(timer, fn, data):设置定时器,主要是初始化 timer_list 结构体
- void add_timer(struct timer_list *timer):向内核添加定时器。timer->expires 表示超时时间。 当 超 时 时 间 到 达 , 内 核 就 会 调 用 这 个 函 数 :timer->function(timer->data)。
- int mod_timer(struct timer_list *timer, unsigned long expires): 修改定时器的超时时间,
- int del_timer(struct timer_list *timer):删除定时器。
19.5.2 定时器时间单位
.config 中有配置 CONFIG_HZ=100, 核每秒中会发生 100 次系统滴答中断(tick).
- 在 add_timer 之前,直接修改
timer.expires = jiffies + xxx; // xxx 表示多少个滴答后超时,也就是 xxx*10ms timer.expires = jiffies + 2*HZ; // HZ 等于 CONFIG_HZ,2*HZ 就相当于 2 秒 - 在 add_timer 之后,使用 mod_timer 修改:
mod_timer(&timer, jiffies + xxx);   // xxx 表示多少个滴答后超时,也就是 xxx*10ms
mod_timer(&timer, jiffies + 2*HZ);  // HZ 等于 CONFIG_HZ,2*HZ 就相当于 2 秒
19.5.5 深入研究:定时器的内部机制
对于 TIMER_SOFTIRQ 软中断,初始化代码如下:
void __init init_timers(void)
{
  init_timer_cpus();
  init_timer_stats();
  open_softirq(TIMER_SOFTIRQ, run_timer_softirq);
}
当发生硬件中断时,硬件中断处理完后,内核会调用软件中断的处理函数。对于 TIMER_SOFTIRQ,会调用 run_timer_softirq,它的函数如下:
run_timer_softirq
__run_timers(base);
    while (time_after_eq(jiffies, base->clk)) {
        ……
expire_timers(base, heads + levels);
    fn = timer->function;
    data = timer->data;
    call_timer_fn(timer, fn, data);
        fn(data);
19.5.6 深入研究:找到系统滴答
# cat /proc/interrupts找到 ticker 中断名$ grep "i.MX Timer Tick" * -nr找到对应的文件drivers/clocksource/timer-imx-gpt.c:319: act->name = "i.MX Timer Tick";
19.6 中断下半部 tasklet
19.6.1 内核函数
- 定义 tasklet 它 在 内 核 源 码
include\linux\interrupt.h中定义:struct tasklet_struct { struct tasklet_struct *next; unsigned long state; atomic_t count; void (*func)(unsigned long); unsigned long data; };// DECLARE_TASKLET 定义的 tasklet 结构体,它是使能的; #define DECLARE_TASKLET(name, func, data) \ struct tasklet_struct name = { NULL, 0, ATOMIC_INIT(0), func, data } // DECLARE_TASKLET_DISABLED 定义的 tasklet 结构体,它是禁止的;使用之前要先调用 tasklet_enable 使能它。 #define DECLARE_TASKLET_DISABLED(name, func, data) \ struct tasklet_struct name = { NULL, 0, ATOMIC_INIT(1), func, data } // 使用函数来初始化 tasklet 结构体: extern void tasklet_init(struct tasklet_struct *t, void (*func)(unsigned long), unsigned long data); - 使能/禁止 tasklet
static inline void tasklet_enable(struct tasklet_struct *t); static inline void tasklet_disable(struct tasklet_struct *t); - 调度 tasklet
static inline void tasklet_schedule(struct tasklet_struct *t); - kill tasklet
extern void tasklet_kill(struct tasklet_struct *t);
19.6.2 tasklet 使用方法
先定义 tasklet,需要使用时调用 tasklet_schedule,驱动卸载前调用 tasklet_kill。tasklet_schedule 只是把 tasklet 放入内核队列,它的 func 函数会在软件中断的执行过程中被调用。
19.6.3 tasklet 内部机制
- tasklet属于TASKLET_SOFTIRQ软件中断,入口函数为 tasklet_action,这在内核 kernel\softirq.c 中设置.
- 当驱动程序调用 tasklet_schedule 时,会设置 tasklet 的 state 为TASKLET_STATE_SCHED,并把它放入某个链表
- 当发生硬件中断时,内核处理完硬件中断后,会处理软件中断。对于TASKLET_SOFTIRQ 软件中断,会调用 tasklet_action 函数。
- 如果 tasklet 的函数尚未执行,多次调用 tasklet_schedule 也是无效的,只会放入队列一次。
19.7 工作队列
19.7.1 内核函数
- 定义 work
#define DECLARE_WORK(n, f) \ struct work_struct n = __WORK_INITIALIZER(n, f) // #define DECLARE_DELAYED_WORK(n, f) \ struct delayed_work n = __DELAYED_WORK_INITIALIZER(n, f, 0) - 使用 work:schedule_work 调用 schedule_work 时,就会把 work_struct 结构体放入队列中,并唤醒对应的内核线程。内核线程就会从队列里把 work_struct 结构体取出来,执行里面的函数。
19.7.3 内部机制
代码在 kernel\workqueue.c 中
init_workqueues
keventd_wq = create_workqueue("events");
    __create_workqueue((name), 0, 0)
        for_each_possible_cpu(cpu) {
            err = create_workqueue_thread(cwq, cpu);
                p = kthread_create(worker_thread, cwq, fmt, wq->name, cpu);
19.8 中断的线程化处理
19.8.1 内核机制
request_threaded_irq 函数,肯定会创建一个内核线程。源码在内核文件 kernel\irq\manage.c 中
19.8.2 编程、上机
调用 request_threaded_irq 函数注册中断,调用 free_irq 卸载中断。
19.9 mmap
让程序可以直接读写驱动程序中的 buffer,这可以通过mmap 实现(memory map),把内核的 buffer 映射到用户态,让 APP 在用户态直接读写。
