android 使用中学习到很多新的东西,记录下来防止忘记。
android studio 快捷键
ctr + h 打开继承关系
shift + f1 打开类的帮助网页
1. setContentView(R.layout.activity_game); 这个代码会把 activity_game 这个 xml 里面包含的 fragment 对应的类 都进行 onCreate,然后 onCreateView,之后才执行这个语句下面的句子。
2. SharedPreferences 保存少量数据
private SharedPreferences sp;
private final static String PREFRENCE_FILE_KEY = "com.shared_preferences";
sp = getSharedPreferences(PREFRENCE_FILE_KEY, MODE_PRIVATE);

final SharedPreferences.Editor editor = sp.edit();
editor.putInt("id",1);
editor.putString("name","小熊");
editor.putInt("age",24);
editor.commit();

TextView textView = (TextView)findViewById(R.id.text);
String message = "id = " + mSharedPreferences.getInt("id",-1)
        + ",name = " + mSharedPreferences.getString("name","无")
        + ",age = " + mSharedPreferences.getInt("age",-1)+"。";
textView.setText(message);
3. println() 函数的输出,可以在 logcat 里面,过滤填写 system.out,即可看到了。参考:http://www.pianshen.com/article/6032179657/
4. BroadcastReceiver 可以用来针对一些事情进行广播,比如说耳机插入,蓝牙接入等等。广播可以是标准广播,大家都能收到,或者有序广播,前面收到的可以截断广播。
5. totast 用来进行小的信息提示,存在2秒左右。
6. bundle 作为信息的载体,内部是一个 Map<string, object>, intent 持有一个 bundle,可以作为 activity 之间信息交互的桥梁。message 也可以持有 bundle,可以用于线程之间信息的交互。
7. ui 的线程作为主线程,其他的线程都是辅助线程,他们之间的通讯需要使用 handle 和 message来进行,具体参考这篇文章.
https://www.cnblogs.com/fuck1/p/5513412.html
8. onConfigurationChanged() 这个主要用于屏幕在横屏和竖屏之间切换时候触发。
9. Runnable 只是一个接口,其中的 run() 是执行函数体。在主线程中直接调用这个 run(),那么就是跑在主线程里面。只有使用 new Thread()来实现这个线程,然后调用 start() 来启动新的线程,新的线程会自动运行 run() 这个函数体,运行结束之后,新线程结束。 具体参考: https://www.cnblogs.com/yuhanghzsd/p/5581918.html
10. synchronized 用来多线程中作为锁使用。可以直接修饰方法,也可以 synchronized(tmp) 这个来锁一个变量。都能够使得相应的方法锁住。在代码块中可以使用 notifyAll() 来唤醒其他等待锁的线程。 参考:https://www.jianshu.com/p/35af333fdde4 和 https://www.jianshu.com/p/6999a3fa7372
11. wait() 需要在synchronized 中使用。 参考:https://blog.csdn.net/qq_30379689/article/details/53863082
12. 接口回调函数。首先定义一个接口,接口中包含方法的申明。然后在模块类中定义一个接口变量,然后在模块类中的方法里面对这个接口变量赋值,然后在模块类中的方法里面调用这个接口的方法。最后在UI类中定义这个接口方法的具体实现。这样,当模块类执行到相应方法的时候,就会调用 UI 类中的具体实现。
MyListener.java
public interface MyListener {
    // you can define any parameter as per your requirement
    public void callback(View view, String result);
}
MyButton.java
public class MyButton {
    MyListener ml;

    // constructor
    MyButton(MyListener ml) {
        //Setting the listener
        this.ml = ml;
    }

    public void MyLogicToIntimateOthers() {
        //Invoke the interface
        ml.callback(this, "success");
    }
}
MyActivity.java
public class MyActivity extends Activity implements MyListener {
   @override
   public void onCreate(){
        MyButton m = new MyButton(this);
   }

    // method is invoked when MyButton is clicked
    @override
    public void callback(View view, String result) {
        // do your stuff here
    }
}
当执行MyButton 中方法MyLogicToIntimateOthers 的时候,就会调用 MyActivity 中的 callback,参数就是 MyButton 和 "success"。实际使用中 MyLogicToIntimateOthers 这种函数经常会放到多线程的 run() 中来执行。
参考: https://stackoverflow.com/questions/994840/how-to-create-our-own-listener-interface-in-android/18585247#18585247 https://www.jianshu.com/p/e2b71caf45ee https://blog.csdn.net/uljisang/article/details/71340301
13. 当 build 的时候,提示 Failed to delete some children. This might happen because a process has files open or has its working directory set in the target directory. 有可能是使用了 as 自带的 terminal 窗口,并且打开了相应的目录,只需要在 相应的命令行里面 exit 几下,推出目录即可。
14. 抓取log,可以使用含有 adb.exe, adbwinapi.dll, adbwinusbapi.dll 的软件,比如说 platform-tools-latest-windows.zip,或者鲁大师都可以。使用命令行打开目录到 adb.exe 的位置,然后使用 adb devices 命令查看链接的设备,使用 adb shell 进入 adb模式,使用 logcat -v time >/etc/1.log 来开始保存 log,ctrl+c 停止保存 log,logcat -c 清除日志。向手机传文件,使用 adb push c:\hosts /etc/。从手机传文件,使用 adb pull /etc/hosts c:\。
参考:https://blog.csdn.net/u010323805/article/details/78091123 参考:https://blog.csdn.net/dodod2012/article/details/80824395
15. 串口 native 驱动方法的时候,可以参考两篇文章关于串口参数的。
http://man7.org/linux/man-pages/man3/termios.3.html https://blog.csdn.net/guo_wangwei/article/details/1102931#
16. consider adding at least one Activity with an ACTION-VIEW 提示这个警告,只需要在AndroidManifest.xml文件中,至少一个activity的intent-filter中添加
<action android:name="android.intent.action.VIEW" />17. Consider adding the attribute 'android:fullBackupContent' to specify an '@xml' resource which configures which files to backup.这个警告,可以 android:allowBackup="false" 来禁止备份。如果要开启备份,那就需要以下工作:
- 在 AndroidManifest.xml 文件中 application 里添加 android:fullBackupContent 属性,指定一个包含备份规则的 XML 文件。 android:fullBackupContent="@xml/my_backup_rules"
- 在 res/xml/ 目录中创建一个名为 "my_backup_rules.xml" 的 XML 文件。 其中,
元素指定 备份 哪些文件, 元素指定 不备份 哪些文件。
该配置文件的 XML 语法规则如下:(语法规则摘自: 数据存储:数据备份:自动备份)
<?xml version="1.0" encoding="utf-8"?>

<full-backup-content>
    <include
        domain=["file" | "database" | "sharedpref" | "external" | "root"]
        path="string" />
    <exclude
        domain=["file" | "database" | "sharedpref" | "external" | "root"]
        path="string" />
</full-backup-content>
在
-
指定要 备份 的 文件 或 文件夹。 默认情况下,自动备份几乎包含所有应用程序文件。 如果指定了 元素,则系统默认不再包含任何文件,并且仅备份指定的文件。 要包含多个文件,请使用多个 元素。
注意:getCacheDir(),getCodeCacheDir() 或 getNoBackupFilesDir() 返回的目录中的文件总是被排除,即使你尝试包含它们。
-
指定在 备份 期间要 排除 的 文件 或 文件夹。 以下是通常从备份中排除的一些文件: Ⅰ. 具有设备特定标识符的文件,由服务器颁发或在设备上生成。 例如,Google Cloud Messaging(GCM)需要在每次用户在新设备上安装您的应用程序时生成注册令牌。 如果旧的注册令牌已恢复,应用程序可能会出现意外。 Ⅱ. 账户凭证或其他敏感信息。 考虑要求用户在第一次启动还原的应用程序时重新认证,而不是允许在备份中存储此类信息。 Ⅲ. 与应用程序调试相关的文件,如即时运行文件。 要排除即时运行文件,请添加规则 Ⅳ. 导致应用超出 25MB 备份配额的大文件。 注:如果你的配置文件指定了这两个元素,则备份 包含由 元素捕获的所有内容减去 元素中命名的资源。 换句话说, 优先。
每个元素必须包含以下 2 个属性: Ⅰ. domain:指定资源的位置。 此属性的有效值包括以下内容:
- root:存储属于此应用程序的所有私有文件的文件系统上的目录。
- 文件:由 getFilesDir() 返回的目录。
- 数据库:由 getDatabasePath() 返回的目录。使用 SQLiteOpenHelper 创建的数据库存储在此处。
- sharedpref:存储 SharedPreferences 的目录。
- 外部由 getExternalFilesDir() 返回的目录。 注:你无法备份这些位置之外的文件。
Ⅱ. path:指定要从备份中包含或排除的文件或文件夹。 注意:
- 此属性不支持通配符或正则表达式语法。
- 您可以使用 "." 引用当前目录,但是,出于安全考虑,您无法引用父目录。
- 如果指定目录,则该规则适用于目录中的所有文件和递归子目录。
参考:https://blog.csdn.net/u013719138/article/details/79276370
18. Synchronization on a non-final field. 同步的 object 最好是用 final 的。
19. android studio 不用 e.printStackTrace();使用 Log.e(TAG,Log.getStackTraceString(e)) 来打印异常。
也可以参考:
 catch (Exception e) {
            e.printStackTrace();// 只能输出在控制台当中,日志文件看不到
            System.out.println("--------------------");
            log.error(e.getMessage());// 只能输出简短的错误信息,不便于排错
            System.out.println("--------------------");
            log.error(e.getStackTrace().toString());// 不能输出错误信息
            System.out.println("--------------------");
            log.error("test fail:",e);// 可以在日志中输出完整的错误信息,""里要写内容
            System.out.println("--------------------");
            log.error(e.toString());// 只能输出简短的错误信息,不便于排错
        }
参考: https://blog.csdn.net/m0_37842716/article/details/89921310
20. 数组复制,使用 System.arraycopy。Arrays.copyOf 和 Arrays.copyOfRange 会创建一个新的数组并返回。 定义数组的时候,可以使用 .clone() 的方法来生成另外一个数组的拷贝。 当然也可以实现Cloneable接口,并重写clone方法,注意一个类不实现这个接口,直接使用clone方法是编译通不过的。
Arrays.copyOf(original, length)
T[] java.util.Arrays.copyOfRange(T[] original, int from, int to)
参考:
https://blog.csdn.net/jinyuehai/article/details/114092844
https://blog.csdn.net/xmfjmcwf/article/details/83903153
https://www.cnblogs.com/ping2yingshi/p/12531721.html
21. 布局中分割线可以用 linearlayout.divider 来设置。具体参考:https://blog.csdn.net/qq_36523667/article/details/80184646
android:gravity 让器件向某个方向偏。
22. 当某个继承类内部重写了回调事件的处理方法,那么这个类就不需要用 setxxxListener 的方法来绑定一个监听事件类,直接使用自己内部的回调方法就可以。但是注意:在 xml 里面一定要写这个新的类的全名
public class MyButton extends Button{
    private static String TAG = "呵呵";
    public MyButton(Context context, AttributeSet attrs) {
        super(context, attrs);
    }

    //重写键盘按下触发的事件
    @Override
    public boolean onKeyDown(int keyCode, KeyEvent event) {
        super.onKeyDown(keyCode,event);
        Log.i(TAG, "onKeyDown方法被调用");
        return true;
    }
}
<RelativeLayout xmlns:android="http://schemas.android.com/apk/res/android"
xmlns:tools="http://schemas.android.com/tools"
android:layout_width="match_parent"
android:layout_height="match_parent"
tools:context=".MyActivity">
<example.jay.com.mybutton.MyButton
android:layout_width="wrap_content"
android:layout_height="wrap_content"
android:text="按钮"/> 参考:https://www.runoob.com/w3cnote/android-tutorial-callback-event-handle.html
23. 回调函数的返回值是 true 的时候,说明事件已经处理完成,如果是 false,那么还要继续传播,直到触发 activity 的处理函数。优先级是: setxxxListener 指定的监听器内的回调方法 --> 继承 view 中重写的回调方法 --> activity 中重写的回调方法。
参考: https://www.runoob.com/w3cnote/android-tutorial-callback-event-handle.html
24. 最近用到handle在线程中改变UI,会跟给出“This Handler class should be static or leaks might occur”的警告.解决方法如下:
static class MyHandler extends Handler {
    //注意下面的“PopupActivity”类是MyHandler类所在的外部类,即所在的activity
    WeakReference<PopupActivity> mActivity;

    MyHandler(PopupActivity activity) {
        mActivity = new WeakReference<PopupActivity>(activity);
    }

    @Override
    public void handleMessage(Message msg) {
        PopupActivity theActivity = mActivity.get();
        switch (msg.what) {
        //此处可以根据what的值处理多条信息
        case 0x0001:
            //这里可以改变activity中的UI控件的状态
            theActivity.textView.setText(R.string.hello_world);
            break;
        }
        case 0x0002:
            //这里可以改变activity中的UI控件的状态
            theActivity.textView.setText(R.string.welcome);
            break;
        /*这里可以有多条要处理信息的操作*/
        /*... ...*/
    }
    }
};
//实例化一个MyHandler对象
MyHandler testHandler = new MyHandler(this);

private void test1() {
    //这里发送了一个空消息,空消息的what值是0x0001
    testHandler.sendEmptyMessage(0x0001);
}

private void test2() {
    //这里发送了一个空消息,空消息的what值是0x0001
    testHandler.sendEmptyMessage(0x0002);
}
参考: https://www.cnblogs.com/welhzh/p/3585478.html
25. async 中的 doInBackground 的返回值用于 onPostExecute 的参数,做为线程最后的收尾方法。
26. 可以让所有的 activity 继承自一个自定义的 baseactivity 类,在这个类的 oncreate 方法中添加 log.d("BaseActivity", getClass().getSimpleName()); 这样每当一个 activity 启动时都会打印具体的类。
27. 可以创建一个 activity 的管理类,每当一个 activity 启动,就向 list 中增加,推出,就减少。可以通过 对这个 list 中所有的 activity 使用 finish 来退出所有的 activity。需要在 baseactivity 中的 oncreate 方法里面添加 addactivity 的调用,在 onDestory 中添加 removeactivity 的调用,这个可以在任何一个 activity 中调用 finishall 来关闭所有,从而推出 app。还可以设置双击返回键退出 app。
参考: https://www.runoob.com/w3cnote/android-tutorial-activity-start.html https://www.jianshu.com/p/0b979a69756c
28. activity 过渡动画,参考:https://www.runoob.com/w3cnote/android-tutorial-activity-start.html
29. bundle 传递数据,需要小于 0.5MB,如果大,会报 TransactionTooLargeException 异常。
30. activity 全屏的方法:
- oncreate 中调用 getActionBar.hide();
- 把 requestWindowFeature(Window.FEATURE_NO_TITLE);放在super.onCreate(savedInstanceState);前面
- androidmanifest.xml 中的 theme 里面,在需要全屏的Activity的标签内设置 theme = @android:style/Theme.NoTitleBar.FullScreen
31. onWindowFocusChanged 方法可以用来监控 activity 是否加载完毕。
32. activity 正常是保存在 task 里面的。按 home ,会返回桌面和调出前段时间使用过的 task 列表。可以设置 activity 的属性,让activity 独占 task 或者其他可能。
完整的 activity manager 类, 参考:https://www.runoob.com/w3cnote/android-tutorial-activity-intro.html
33. java.lang.IllegalArgumentException: Service Intent must be explicit: Intent 这个报警只需要添加一句代码:
intent.setPackage(getPackageName());参考:https://www.cnblogs.com/brucemengbm/p/7234128.html
34. activity 和 service 通信,需要使用 自定义的 binder 类,把需要暴露的方法写到这个类中,然后重写 service 的 onBind 方法,把这个 binder 对象 return 回去。然后在 activity 中实例化一个 serviceconnection 对象,重写 onserviceconnected 方法,获取这个 binder 对象,然后调用相关方法即可。
参考: https://www.runoob.com/w3cnote/android-tutorial-service-1.html https://www.runoob.com/w3cnote/android-tutorial-service-2.html
35. getNotification 方法废弃后,可以用 build 来代替。
startForeground(1, localBuilder.build());还有别忘了许可
<uses-permission android:name="android.permission.FOREGROUND_SERVICE"/>还有别忘了在onDestroy里面调用stopForeground。
36. 把 service 绑定到 alarm 上面后,就可以执行定时的后台服务。具体参考:
https://www.runoob.com/w3cnote/android-tutorial-service-2.html
37. new --> aidl --> aidl file 新建一个 aidl 文件后,要记得 rebuild project,否则不能生成对应的 java 文件。还有注意 aidl 里面不要有中文,否则可能生成的 java 是空的。
38. bindService 返回 false。解决从如下几个方面来看:
- aidl 文件:IPerson.aidl,所在的包是 com.example.aidl ; service类是 AidlService,所在的包是 com.example.aidlservice ; client 类是 MainActivity,所在的包是 com.jay.example.aidlclient。把 aidl 文件所在的文件夹,从 server 中整个复制到 client 中。
- AidlService 中 onBind() 注意要 return IBinder 对象。
- service 的 配置文件中
这里面的 name 可以自由设置。 - client 的 MainActivity 中 Intent service = new Intent("android.intent.action.AIDLService123"); 注意这里面的参数是和 service 配置文件中的 name 一致。
- client 的 MainActivity 中 service.setPackage("com.example.aidlservice"); 注意这个参数是 service 中我们自定义的类 AidlService 所在的包名称。
达到上面几点,基本就 bindservice 就没有问题了。
参考: https://www.runoob.com/w3cnote/android-tutorial-service-3.html https://blog.csdn.net/u012810034/article/details/71523847
39. 对于没有 activity 的 server 想要运行调试,只需要在 android studio 中 app 运行配置中选择 launch: nothing 即可。
参考: https://blog.csdn.net/qq_36792930/article/details/91041904
40. parcelable 实现的时候, newArray() 方法中 return new T[0] 改为 return new T[size]。
具体参考: https://www.cnblogs.com/renqingping/archive/2012/10/25/Parcelable.html
41. aidl 报错误 couldn't find import for class。解决如下:
- aidl 文件: ISalary.aidl 所在的包是 com.runoob.aidl123 , ISalary.aidl 是实质性的 aidl 文件。里面的方法申明,参数中包含了 Person 和 Salary 类。需要 import 相应的类。
- Person.java,salary.java 里面实现了 Parcelable, 所在的包是 com.runoob.classserver。
- 建立 Person.aidl 文件,里面两句代码: package com.runoob.classserver; 注意这个必须和 Person.java 是同一个包名。parcelable Person; 这个表明是序列化的 Person。
- 仿照 Person.aidl,建立 Salary.aidl。
主要注意,java 和 aidl 同名的文件,包名也要一致不然找不到。
42. 服务通信,也可以不使用 aidl,直接用 transact 来实现。因为 aidl 本来就是在 transact 上面封装了一层,所以直接用 transact 可以不用 aidl 文件,就是自己实现, 代码稍微难看一点。但是 配置文件里面的 这个是少不了的。
具体参考 : https://www.runoob.com/w3cnote/android-tutorial-service-3.html https://blog.csdn.net/lmj623565791/article/details/38461079#t9
43. 可以使用 maven 来简化一些依赖。
参考: https://www.cnblogs.com/lixiangyang521/p/7760754.html https://blog.csdn.net/kdsde/article/details/90915634
44. 广播分为动态和静态两种。动态不需要在配置文件中注册,静态需要修改配置文件,进行注册。动态广播,必须软件打开才能接收。静态广播,开机就能够接收广播了。
45. 自定义广播,要注意,发送app 中的 sendBroadcast(new Intent("com.example.broadcasttest.MY_BROADCAST")); 需要和接收app 的配置文件中的
参考: https://www.runoob.com/w3cnote/android-tutorial-broadcastreceiver.html
46. 在你的activity动作完成的时候,或者Activity需要关闭的时候,调用 Activity.finish()。 fininsh 方法调用的时候,系统移除了 activity,但并不会立刻销毁,所以,过一段时间后,系统才会调用 Activity.onDestory() 来回收空间。
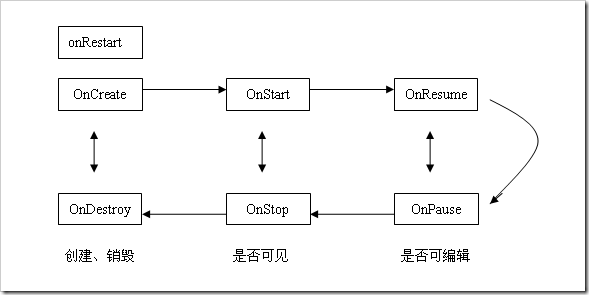
并且不同阶段调用 finish,也会调用到不同的函数。 Calling finish() in onCreate(): onCreate() -> onDestroy() Calling finish() in onStart() : onCreate() -> onStart() -> onStop() -> onDestroy() Calling finish() in onResume(): onCreate() -> onStart() -> onResume() -> onPause() -> onStop() -> onDestroy()
参考:https://blog.csdn.net/soulmeetliang/article/details/62280342 https://blog.csdn.net/weixin_30654419/article/details/95311721 https://blog.csdn.net/hyz5159037/article/details/8151463 https://blog.csdn.net/u012359453/article/details/89252260 https://blog.csdn.net/houdezaiwu01/article/details/51526607?depth_1-utm_source=distribute.pc_relevant.none-task&utm_source=distribute.pc_relevant.none-task
47. 哪个 activity 是首个页面,像下面那样来设置:
android.intent.action.MAIN:决定应用的入口Activity,也就是我们启动应用时首先显示哪一个Activity。 android.intent.category.LAUNCHER:表示activity应该被列入系统的启动器(launcher)(允许用户启动它)。Launcher是安卓系统中的桌面启动器,是桌面UI的统称。
参考:https://www.cnblogs.com/zhaogaojian/p/9480217.html
48. 在 app 内部进行广播可以使用本地广播, LocalBroadcastManager, 还需要 IntentFilter 配合一起使用。 别忘了 registerReceiver 和 onDestroy 中的 unregisterReceiver 。
AlertDialog 使用 setType 时候, 使用 WindowManager.LayoutParams.FIRST_SYSTEM_WINDOW + 3 来代替废弃的 SYSTEM_ALERT_WINDOW 。 还有别忘了要注册许可:uses-permission android:name="android.permission.SYSTEM_ALERT_WINDOW"。
当在广播中设置监听器的时候,如果要使用 Intent,需要类似下面的方法:
Intent intent = new Intent(context, LoginActivity.class);
intent.addFlags(Intent.FLAG_ACTIVITY_NEW_TASK);
context.startActivity(intent);
参考: https://www.runoob.com/w3cnote/android-tutorial-broadcastreceiver-2.html
49. 当需要监听 sd 卡的时候,因为 sd 卡是开机后才挂载的,所以注册时候,要分开来些。
<receiver android:name=".MyBroadcastReceiver">
    <intent-filter>
        <action android:name="android.intent.action.BOOT_COMPLETED"/>
    </intent-filter>
    <intent-filter>
        <action android:name="ANDROID.INTENT.ACTION.MEDIA_MOUNTED"/>
        <action android:name="ANDROID.INTENT.ACTION.MEDIA_UNMOUNTED"/>
        <data android:scheme="file"/>
    </intent-filter>
</receiver>
android 常用广播参考: https://www.runoob.com/w3cnote/android-tutorial-broadcastreceiver-2.html
50. 调试的时候,想要看到 /data/data 这种隐藏文件夹,需要在 android studio 中点击 右下角的 Device file explorer,即可看到所有文件,然后找到相应的文件后,右键另存为即可保存到 pc 上面。或者 View > Tool Windows > Device File Explore。
参考: https://www.jianshu.com/p/535ba644cbd3
51. 获取系统里面的图片资源,或者文件资源,使用 contentprovider。也可以把自己的数据包装一下,实现为 documentprovider,给其他应用使用。
参考:https://www.runoob.com/w3cnote/android-tutorial-contentprovider-2.html
52. activity 正常可以通过 startActivity 这样显式启动,也可以通过隐式启动。隐式的方法是:指定Intent的Action,Data,或Category,当我们启动组件时, 会去匹配AndroidManifest.xml相关组件的Intent-filter,逐一匹配出满足属性的组件,当不止一个满足时, 会弹出一个让我们选择启动哪个的对话框。
new Intent(oneActivity.this, secondActivity.class); 第一个参数是上下文,就是 content,也就是包名,第二个参数是类名,这样包名+类名就是唯一限定类了。 一个 intent 的只有一个 action,但是可以有多个 category. data, type 在配置文件中 data 标签下面设置。 extras 用于数据交换时的 bundle 类型。 flag 用于 activity 如何启动,以及启动后如何对待。
返回桌面:
it.setAction(Intent.ACTION_MAIN);
it.addCategory(Intent.CATEGORY_HOME);
打开网页:
it.setAction(Intent.ACTION_VIEW);
it.setData(Uri.parse("http://www.baidu.com"));
隐式启动的时候,比较 intent 中的 action 和 category,action 可以是系统定义的,也可以是自定义的。 category 自定义的时候,要注意,还要添加上 DEFATLT,不然会报错。如下:
Intent it = new Intent();
it.setAction("my_action");
it.addCategory("my_category");
startActivity(it);
<activity android:name=".SecondActivity"
android:label="第二个Activity">
<intent-filter>
<action android:name="my_action"/>
<category android:name="my_category"/>
<category android:name="android.intent.category.DEFAULT"/>
</intent-filter>
</activity>常用 intent 参考: https://www.runoob.com/w3cnote/android-tutorial-intent-base.html
action 可以从这里查看: sdk-->docs-->reference-->android--->content--->Intent.html , 从这个Constants开始就是了。
53. intent 传递数组,使用putStringArray 和 getStringArray 这样的。
intent 传递集合 list:
-
List<基本数据类型或String>
intent.putStringArrayListExtra(name, value) intent.putIntegerArrayListExtra(name, value) intent.getStringArrayListExtra(name) intent.getIntegerArrayListExtra(name) - List< Object>将list强转成Serializable类型,然后传入(可用Bundle做媒介)Object类需要实现Serializable接口
putExtras(key, (Serializable)list) (List<Object>) getIntent().getSerializable(key) - 在外层套个 list 的壳子。
intent 传递对象: 将对象转换为Json字符串或者通过Serializable,Parcelable序列化 不建议使用Android内置的抠脚Json解析器,可使用fastjson或者Gson第三方库! Parcelable 可以使用插件: Android Parcelable code generator 来自动生成。
Bitmap 本身实现了Parcelable, 直接传递即可。
或者直接使用 application 级别的全局变量,给整个 app 的 activity 使用。但是要注意:如何按 home 按键,让 app 处于后台,时间长了,可能会被杀后台。这时候让后台任务回到前台,只有 app 最后一个 activity 是保留的,整个app其他内容都是重新创建的,这样会导致全局变量被初始化了。所以这样的情况最好做成本地存储。
还可以使用单例模式传递,只是要注意线程安全。 参考:https://www.runoob.com/w3cnote/android-tutorial-intent-pass-data.html
54. 'com.github.dcendents.android-maven' not found.
错误原因:导入了一个module 其build.gradle引用了
apply plugin: 'com.github.dcendents.android-maven'导入后项目提示
Plugin with id 'com.github.dcendents.android-maven' not found解决方式:在project目录下的build.gradle对应位置添加
classpath 'com.github.dcendents:android-maven-gradle-plugin:1.5'请在这里查对应的maven-gradle-plugin版本, https://github.com/dcendents/android-maven-gradle-plugin
| Plugin Version | Plugin Name | Dependency Information | Gradle Version |
|---|---|---|---|
| 1.0 | android-maven | com.github.dcendents:android-maven-plugin:1.0 | 1.8+ |
| 1.1 | android-maven | com.github.dcendents:android-maven-plugin:1.1 | 1.12+ |
| 1.2 | com.github.dcendents.android-maven | com.github.dcendents:android-maven-plugin:1.2 | 2.2+ |
| 1.3 | com.github.dcendents.android-maven | com.github.dcendents:android-maven-gradle-plugin:1.3 | 2.4+ |
| 1.4.1 | com.github.dcendents.android-maven | com.github.dcendents:android-maven-gradle-plugin:1.4.1 | 2.14+ |
| 1.5 | com.github.dcendents.android-maven | com.github.dcendents:android-maven-gradle-plugin:1.5 | 3.0+ |
| 2.0 | com.github.dcendents.android-maven | com.github.dcendents:android-maven-gradle-plugin:2.0 | 4.1+ |
| 2.1 | com.github.dcendents.android-maven | com.github.dcendents:android-maven-gradle-plugin:2.1 | 4.6+ |
参考: https://blog.csdn.net/qq_23089525/article/details/77935014
55. 同一个 activity 中的不同 fragment 之间传递数据。可以在 activity 里面建立方法,然后在 fragment 中调用相应的方法,类似:
((MainActivity)getActivity()).setValueResultData(0x123);参考: https://blog.csdn.net/hd12370/article/details/82825077 https://blog.csdn.net/harvic880925/article/details/44131865 https://blog.csdn.net/harvic880925/article/details/44966913
56. activity 返回数据给上一个 activity,可以这样写
    @Override
    protected void onCreate(Bundle savedInstanceState) {
        super.onCreate(savedInstanceState);
        setContentView(R.layout.activity_first);

        gotoSecondBtn = findViewById(R.id.goto_second_btn);
        //对按钮进行监听
        gotoSecondBtn.setOnClickListener(new View.OnClickListener() {
            @Override
            public void onClick(View v) {
                //使用intent进行跳转
                Intent intent = new Intent(FirstActivity.this, SecondActivity.class);
                //启动跳转,这里使用startActivityForResult()方法,这个方法会在跳转到的活动页面销毁时,返回一个数据给上一个活动
                /**
                 * param1:intent
                 * param2:请求码,用于回调时判断数据的来源
                 */
                startActivityForResult(intent, 1);
            }
        });
    }

    @Override
    protected void onActivityResult(int requestCode, int resultCode, Intent data) {
        super.onActivityResult(requestCode, resultCode, data);
        Log.e(TAG, "onActivityResult1: "+data );
        switch (resultCode) {
            //下面的1为startActivityForResult(intent, 1);中的1
            case 1:
                //这里的1为setResult(1, intent);中的1
                if (resultCode==1){
                    String str = data.getStringExtra("hello");
                    Log.e(TAG, "onActivityResult2: "+str );
                    String str2 = data.getStringExtra("hi");
                    Log.e(TAG, "onActivityResult3: "+str2 );
                }
                break;

            default:
                break;

        }
    }
secondBtn.setOnClickListener(new View.OnClickListener() {
@Override
public void onClick(View v) {
//创建Intent对象
Intent intent = new Intent();
//通过put()以键值对的方式赋值
intent.putExtra("hi", "hi FirstActivity");
//通过setResult()方法向上一个活动返回结果 param1:处理结果代号
setResult(1, intent);
finish();
}
});
@Override
public void onBackPressed() {
// super.onBackPressed();
Intent intent = new Intent();
intent.putExtra("hello","Hello FirstActivity");
setResult(1,intent);
finish();
}
参考: https://blog.csdn.net/shaochen2015821426/article/details/80155457
57 genymotion 模拟器不适合调试 sqlite,还是需要真机调试。 调试的时候,可以使用 adb shell 来进入真机,然后 cd 到数据库目录,使用 sqlite3 my.db 来进入数据库,.table 查看表, select * from person,查看 person 的表。.quit:退出数据库的编辑, .exit:退出设备控制台。
sqlite3如何退出...>状态 : 只需要执行一条 sql 语句带分号即可, 或者直接输入分号,也能退出这个状态。
MainActivity.this.getDatabasePath("my.db").toString() 可以通过这个获得当前对应的数据库存放的位置。
参考: https://blog.csdn.net/liubingzhao/article/details/47041735 https://www.cnblogs.com/wenjiang/archive/2013/05/28/3100860.html https://www.runoob.com/w3cnote/android-tutorial-sqlite-intro.html
58 is not an enclosing class,
public class A {
    public class B {
    }
};
需要实例B类时,按照正常逻辑是,
A.B ab = new A.B();但是实际上应该这样写:
A a = new A();
A.B ab = a.new B();
没有静态(static)的类中类不能使用外部类进行.操作,必须用实例来进行实例化类中类. 参考: https://www.cnblogs.com/royi123/p/5510867.html
59 vector 中的数据需要打印,可以先生成 array,然后再把 array toString 一下即可。
Vector<Byte> adc = ack.getAdc();
Log.d(TAG, Arrays.toString(adc.toArray()));
60 sqlite3 获取最后一条记录,有几种方法:
-
String find = "SELECT * FROM table";
Cursor cursor = db.rawQuery(find, null);
if (cursor.moveToLast()) { ... }
参考: https://zhidao.baidu.com/question/538870505.html
https://www.oschina.net/question/1391382_132162
https://www.cnblogs.com/clyz/p/3411127.html

#61. sqlite 保存数组
```java
        String insert = "INSERT INTO " +
                "sampleAdc(adcNum, adcBuf) " +
                "values(?, ?)";
      byte[] tmp = {0x12, 0x34, 0x56, 0x78};
      Object[] args = new Object[]{adcNum, tmp};
      db.execSQL(insert, args);
String find = "SELECT * FROM sampleAdc WHERE adcNum = ?";
Cursor cursor = db.rawQuery(find, new String[]{Long.toString(adcNum, 16)});
if (cursor.moveToFirst()) {
byte[] adc = cursor.getBlob(cursor.getColumnIndex("adcBuf"));上面代码就是 sqlite 保存二进制和字符串之间的差别地方。
参考 https://www.cnblogs.com/zhoug2020/p/3723859.html https://blog.csdn.net/xiaoaid01/article/details/17998013 https://www.runoob.com/w3cnote/android-tutorial-sqlite-2.html https://blog.csdn.net/calvin367/article/details/38020081/
62. application 全局变量
public class SupertestApp extends Application 在这个新的类里面至少要实现 onCreate. 然后在 AndroidManifest.xml 里面 <application 下面修改 android:name="SupertestApp"。这样在 activity 的类里面就可以使用 ((SupertestApp)getApplication()).findInfo(adcNum) 这样的语句调用 SupertestApp 里面的函数 findInfo。在 fragment 里面可以使用 ((SupertestApp)getActivity().getApplication()).getCurrentSampleInfo() 这样的语句来调用 application 级别的函数。
参考: https://www.cnblogs.com/maoIT/p/3835833.html
63. radiobutton 是个虚影,很有可能是因为创建 adpater 的时候,不是给的 activity,而是 application,这样就会是个虚影。
这样在 getview 这个方法里面 convertView 下面两种赋值方法都可以。
convertView = activity.getLayoutInflater().inflate(R.layout.project_manage_list_view_item, null);
convertView = activity.getLayoutInflater().inflate(R.layout.project_manage_list_view_item,
parent, false);下面两种方法都不行, context 是 application的。 不管是 getApplicationContext 还是 getApplication 都不行。
convertView = LayoutInflater.from(context).inflate(R.layout.project_manage_list_view_item,
parent, false);
convertView = LayoutInflater.from(context).inflate(R.layout.project_manage_list_view_item, null);63. listview 需要分页显示的时候,主要在 adpater 里面的 getCount 这个方法里面修改,这个函数是返回当前页面有多少个条目。 还要修改 getView 方法,这个方法是用来显示当前页面的。
参考:https://www.cnblogs.com/wangfeng520/p/6178455.html
64. button 和 layout 设置背景如下:
prevPager.setBackgroundColor(getResources().getColor(R.color.backgroundColorSecond));
prevLayout.setBackground(getResources().getDrawable(R.drawable.semicircle_shape_button_disable));65. 使用 libaums 来操作 u 盘碰到 Unsuccessful Csw status: 1,和 分区返回 0 的情况。
Unsuccessful Csw status: 1 有说法是 需要在申请权限后,延迟 1 - 3 秒在 init 设备。 参考: https://github.com/magnusja/libaums/issues/124 分区返回0 有说法是在使用 usb 读卡器的情况下出现。 implementation 'com.github.mjdev:libaums:0.5.5' 这个版本会出现这个情况。 参考: https://github.com/magnusja/libaums/issues/163
尝试升级到高版本。 implementation 'me.jahnen:libaums:0.7.5',然后在 device.init() 之前增加 Thread.sleep(1000),正常的 u盘和读卡器都可以工作了。 也可以考虑使用 countdown 来实现延时功能。
操作u盘的代码可以参考: https://blog.csdn.net/viking_xhg/article/details/81215297 https://blog.csdn.net/true100/article/details/77775700 https://blog.csdn.net/qq_31939617/article/details/80447276 https://github.com/magnusja/libaums
65. 格式化输出,可以使用 Formatter 构造格式。
两位小数的浮点数格式输出可以如下:
Formatter formatter = new Formatter();
formatter.format("%.2f - %.2f", rangeValue.get(0), rangeValue.get(1));
range.setText(formatter.toString());输出结果类似: 1.00 - 2.00 参考: https://blog.csdn.net/cuixianlong/article/details/78583186
66. 在循环中,让多个字符串连接,最后需要删除最后一个分隔符的时候。可以使用
StringBuilder builder = new StringBuilder("手机号1,手机号2,手机号3,");
String result = builder.deleteCharAt(builder.length() - 1).toString();参考: https://blog.csdn.net/qq_20552525/article/details/92831500
67. 多个 map 合并为一个 map
Map<String, String> map1 = new HashMap<String, String>();
map1.put("one", "一");
map1.put("two", "二");
map1.put("three", "三");
Map<String, String> map2 = new HashMap<String, String>();
map1.put("ten", "十");
map1.put("nine", "九");
map1.put("eight", "八");
// 合并
Map<String, String> combineResultMap = new HashMap<String, String>();
combineResultMap.putAll(map1);
combineResultMap.putAll(map2);参考: https://www.cnblogs.com/han-1034683568/p/10175466.html
68. 读取当前系统时间
SimpleDateFormat simpleDateFormat = new SimpleDateFormat("yyyy-MM-dd HH:mm:ss");
Date date = new Date(System.currentTimeMillis());
String dateTime = simpleDateFormat.format(date); 参考: https://blog.csdn.net/huangshenshen_/article/details/57161724
69. 操作 sqlite 数据库
插入操作:
public void insertSample(SampleInfo info) {
SQLiteDatabase db = superTestDBOpenHelper.getWritableDatabase();
String insert = "INSERT INTO " +
"sampleInfo(id, name, sex, age, examinationclerk, projectId, projectCol, " +
"ratio, gradient, concentration, conclusion, sampleTime, visible, adcNum) " +
"values(?, ?, ?, ?, ?, ?, ?, " +
"?, ?, ?, ?, ?, ?, ?)";
String[] param = info.getInfo();
Log.d(TAG, "insertSample: " + info.toString());
db.execSQL(insert, param);
}查找操作:
public SampleInfo findSample(String id) {
//SampleInfo info = new SampleInfo();
SQLiteDatabase db = superTestDBOpenHelper.getReadableDatabase();
String find = "SELECT * FROM sampleInfo WHERE id = ?";
Cursor cursor = db.rawQuery(find, new String[]{id});
if (cursor.moveToFirst()) {
String name = cursor.getString(cursor.getColumnIndex("name"));
String sex = cursor.getString(cursor.getColumnIndex("sex"));
String age = cursor.getString(cursor.getColumnIndex("age"));
String clerk = cursor.getString(cursor.getColumnIndex("examinationclerk"));
String[] param = new String[] {id, name, sex, age, clerk};
info.setPersonalInfo(param);
String projectId = cursor.getString(cursor.getColumnIndex("projectId"));
String projectCol = cursor.getString(cursor.getColumnIndex("projectCol"));
param = new String[] {projectId, projectCol};
info.setProjectInfo(param);
String ratio = cursor.getString(cursor.getColumnIndex("ratio"));
String gradient = cursor.getString(cursor.getColumnIndex("gradient"));
String concentration = cursor.getString(cursor.getColumnIndex("concentration"));
String unit = cursor.getString(cursor.getColumnIndex("unit"));
String conclusion = cursor.getString(cursor.getColumnIndex("conclusion"));
String sampleTime = cursor.getString(cursor.getColumnIndex("sampleTime"));
String visible = cursor.getString(cursor.getColumnIndex("visible"));
param = new String[] {ratio, gradient, concentration, unit, conclusion, sampleTime, visible};
info.setResult(param);
String adcNum = cursor.getString(cursor.getColumnIndex("adcNum"));
param = new String[] {adcNum};
info.setAdcNum(param);
SampleInfo info = getInfo(cursor);
Log.d(TAG, "findSample: " + info.toString());
cursor.close();
return info;
}
cursor.close();
return null;
}插入 blob 操作:
public void insertAdc(long adcNum, byte[] adc) {
SQLiteDatabase db = superTestDBOpenHelper.getWritableDatabase();
String insert = "INSERT INTO " +
"sampleAdc(adcNum, adcBuf) " +
"values(?, ?)";
Object[] args = new Object[]{Long.toString(adcNum, 16), adc};
Log.d(TAG, "insertAdc: adcNum = " + Long.toString(adcNum, 16) + ", adcBuf = " +
Arrays.toString(adc));
db.execSQL(insert, args);
}查找 blob 操作:
public byte[] findAdc(long adcNum) {
//SampleInfo info = new SampleInfo();
SQLiteDatabase db = superTestDBOpenHelper.getReadableDatabase();
        String find = "SELECT * FROM sampleAdc WHERE adcNum = ?";
        Cursor cursor = db.rawQuery(find, new String[]{Long.toString(adcNum, 16)});

        if (cursor.moveToFirst()) {
            byte[] adc = cursor.getBlob(cursor.getColumnIndex("adcBuf"));
Log.d(TAG, "findAdc: " + Arrays.toString(adc));
cursor.close();
return adc;
}
cursor.close();
return null;
}删除操作
    public void deleteProject(int projectId, int batchId, String batchCode,
                              String projectName) {
        SQLiteDatabase db = superTestDBOpenHelper.getWritableDatabase();
        String delete = "DELETE FROM projectConfig WHERE " +
                "projectId = ? AND batchId = ? AND batchCode = ? AND projectName = ?";

        String[] args = new String[] {Integer.toString(projectId), Integer.toString(batchId),
                batchCode, projectName};

        Log.d(TAG, "deleteProject: projectId = " + projectId + ", batchId = " +
                batchId + ", batchCode = " + batchCode + ", projectName = " + projectName);
        db.execSQL(delete, args);
    }
70. string 与 byte[] 互相转换
        byte[] detalArray;
        try {
            detalArray = detail.getBytes("utf-8");
        } catch (Exception e) {
            Log.d(TAG, Log.getStackTraceString(e));
            return;
        }
byte[] detailArray = cursor.getBlob(cursor.getColumnIndex("detail"));
String detail = null;
try {
detail = new String(detailArray, "utf-8");
} catch (Exception e) {
Log.d(TAG, Log.getStackTraceString(e));
return null;
}参考: https://www.cnblogs.com/Marydon20170307/p/9273724.html
71. activity 调用 fragment 中的方法。
   Fragment fragmentPushMealHistory = new pushMealHistoryFragment(ctxt);
   ((pushMealHistoryFragment)fragmentPushMealHistory).updateGridview();
参考: https://www.cnblogs.com/kunyashaw/p/4994963.html
72. listview 倒序显示。
- 可以在 list 插入的时候,选择 addFirst,每次都是把最新的插在最前面。
- 也可以在 list 插入的时候,选择 add,最后使用,Collections.reverse(list); 把整个列表倒序。
- 也可以在 adapter 的 getView 中,显示的时候,在 list.get(i) 的时候,给 i 赋值为 list.size - 1 - position.
73. 输出指定宽度的字符串,不足的补空格。
String name = String.format("%-12s", name);
74. map 遍历可以使用
for(Map.Entry<String, String> entry : map.entrySet() {
    String mapKey = entry.getKey();
    String mapValue = entry.getValue();
}
上面这种适合 key 和 value 都需要用到的场合,如果只需要 key 或者 value,可以下面这种。
for(String key : map.keySet())
for(String value : map.values())
不要在 for 中通过 map.get(key) 这种方式,通过查询 key 来取值。这样效率会比较低,应该使用第一种。
参考: https://www.cnblogs.com/damoblog/p/9124937.html
75. 查看 layout 的 height 和 width.
        final LinearLayout listLayout = view.findViewById(R.id.pm_project_data_list_layout);
        listLayout.post(new Runnable() {
            @Override
            public void run() {
                Log.d(TAG, "list view height = " + listLayout.getHeight());
            }
        });
返回以像素为单位,想要和 dp 转换,需要下面这样。 注意: 这个未经测试。
public int pxToDp(int px)
{
      DisplayMetrics displayMetrics = getContext().getResources().getDisplayMetrics();
      int dp = Math.round(px / (displayMetrics.xdpi / DisplayMetrics.DENSITY_DEFAULT));
      return dp;
}

public int dpToPx(int dp)
{
      DisplayMetrics displayMetrics = getContext().getResources().getDisplayMetrics();
      int px = Math.round(dp * (displayMetrics.xdpi / DisplayMetrics.DENSITY_DEFAULT));
      return px;
}
要将像素转换为dpi,请使用此公式px = dp *(dpi / 160) 据说下面代码可以获得运行时尺寸。
DisplayMetrics displaymetrics = new DisplayMetrics();
getWindowManager().getDefaultDisplay().getMetrics(displaymetrics);
int height = displaymetrics.heightPixels;
int wwidth = displaymetrics.widthPixels;
参考: http://androidcookie.com/getheight%EF%BC%88%EF%BC%89px%E8%BF%98%E6%98%AFdpi%EF%BC%9F.html https://www.cnblogs.com/tc310/p/10739247.html https://www.jianshu.com/p/422ef0d75943
76. 使用 http,可以使用 okHttp,在 minSdkVersion 16 的情况下,只能使用 3.12.x 的版本,3.13.x 会要求最低版本是 24.具体的版本可以参考 https://square.github.io/okhttp/changelog_3x/
正常的添加依赖如下:
dependencies {
    //...
    //OkHttp
    implementation 'com.squareup.okhttp3:okhttp:3.14.2'
    implementation 'com.squareup.okio:okio:1.17.4'
}
77. 系统时间从字符串解析回 Date。
    public static Date strToDateLong(String strDate) {
        SimpleDateFormat formatter = new SimpleDateFormat("yyyy-MM-dd HH:mm:ss");
        ParsePosition pos = new ParsePosition(0);
        Date strtodate = formatter.parse(strDate, pos);
        return strtodate;
    }
参考: https://www.cnblogs.com/kevin-chen/p/7239650.html
78. 获得系统唯一 ID
instrument_number = Settings.Secure.getString(getContentResolver(), Settings.Secure.ANDROID_ID);参考: https://www.cnblogs.com/xieping/p/4784564.html
79. sqlite 清除表,不仅仅清除表本身,如果表主键是自增的,还要清除自增。
DELETE FROM TableName
DELETE FROM sqlite_sequence WHERE name = 'TableName'
也可以设置 sqlite_sequence 为 0
UPDATE sqlite_sequence SET seq = 0 WHERE name = 'TableName'如果所有表的主键自增都删除,可以
DELETE FROM sqlite_sequence参考: https://blog.csdn.net/qq_26462135/article/details/74295905 https://www.oschina.net/question/577276_60172
80. okhttp get 和 pos json
            //创建OkHttpClient对象
            OkHttpClient okHttpClient  = new OkHttpClient.Builder()
                    .connectTimeout(10, TimeUnit.SECONDS)
                    .writeTimeout(10,TimeUnit.SECONDS)
                    .readTimeout(20, TimeUnit.SECONDS)
                    .build();

            final Request request = new Request.Builder()
                    .url("http://172.20.192.168:8080/getbookByFrom?name=android基础&price=50")//请求的url
                    .get()//设置请求方式,get()/post()  查看Builder()方法知,在构建时默认设置请求方式为GET
                    .build(); //构建一个请求Request对象

            //创建/Call
            Call call = okHttpClient.newCall(request);
            //加入队列 异步操作
            call.enqueue(new Callback() {
                //请求错误回调方法
                @Override
                public void onFailure(Call call, IOException e) {
                    System.out.println("连接失败");
                }
                //异步请求(非主线程)
                @Override
                public void onResponse(Call call, Response response) throws IOException {
                    if(response.code()==200) {
                        System.out.println(response.body().string());
                    }
            });

 OkHttpClient okHttpClient  = new OkHttpClient.Builder()
                .connectTimeout(10, TimeUnit.SECONDS)
                .writeTimeout(10,TimeUnit.SECONDS)
                .readTimeout(20, TimeUnit.SECONDS)
                .build();

        Book book = new Book();
        book.setName("android基础");
        book.setPrice(59);
        //使用Gson 添加 依赖 compile 'com.google.code.gson:gson:2.8.1'
        Gson gson = new Gson();
        //使用Gson将对象转换为json字符串
        String json = gson.toJson(book);

        //MediaType  设置Content-Type 标头中包含的媒体类型值
        RequestBody requestBody = FormBody.create(MediaType.parse("application/json; charset=utf-8")
        , json);

         Request request = new Request.Builder()
                .url("http://172.20.192.168:8080/getbookByJson")//请求的url
                .post(requestBody)
                .build();

        //创建/Call
        Call call = okHttpClient.newCall(request);
        //加入队列 异步操作
        call.enqueue(new Callback() {
            //请求错误回调方法
            @Override
            public void onFailure(Call call, IOException e) {
                System.out.println("连接失败");
            }
            @Override
            public void onResponse(Call call, Response response) throws IOException {
                System.out.println(response.body().string());
            }
        });
参考: https://blog.csdn.net/mp624183768/article/details/80905783 https://www.jianshu.com/p/aaa87e8ad9eb https://www.jianshu.com/p/d006bc55bca9
81. popwindow 中的 spinner 点击崩溃。
android.view.WindowManager$BadTokenException: Unable to add window -- token null is not for an application 解决方法很简单,在 spinner 的属性中添加:
android:spinnerMode="dialog"还有检查 inflate 的 view 是不是 activity 的,不要搞到 application 上面去。 参考: https://blog.csdn.net/renjianhhong/article/details/49902837?utm_medium=distribute.pc_relevant.none-task-blog-BlogCommendFromMachineLearnPai2-1.nonecase&depth_1-utm_source=distribute.pc_relevant.none-task-blog-BlogCommendFromMachineLearnPai2-1.nonecase https://blog.csdn.net/jamikabin/article/details/44831235
82. 输入 ip 地址的 editText
                    android:inputType="text"
android:digits="0123456789."Patterns.IP_ADDRESS.matcher("192.168.1.111").matches()82. edittext 只显示一行。
android:lines="1"参考: https://blog.csdn.net/aidou1314/article/details/75116600
83. gson 解析错误
主要注意几点:1. 数值前面不要有空格; 2. 类前面不要有空格。 错误如下:
"{\n" +
"\"resultcode\": 0," +
"\"person\": {" +
"}" +
"}";
上面的 0 前面有空格会解析错误, person 后面这个 { 前面有空格也会解析错误。 正确如下:
"{\n" +
"\"resultcode\":0," +
"\"person\":{" +
"}" +
"}";
84. 提示框。
是否提示框:
        new AlertDialog.Builder(getActivity())
                .setTitle("清空历史数据")
                .setMessage("是否确认")
                .setPositiveButton("是", new DialogInterface.OnClickListener() {
                    @Override
                    public void onClick(DialogInterface dialog, int which) {
                        clear();
                    }
                })
                .setNegativeButton("否", null)
                .show();
查找提示框:
        final EditText editText = new EditText(getActivity());
        editText.setInputType(InputType.TYPE_CLASS_NUMBER);
        editText.setLines(1);
        new AlertDialog.Builder(getActivity())
                .setTitle("查找历史记录")
                .setMessage("请输入身份证号: ")
                .setView(editText)
                .setPositiveButton("确定", new DialogInterface.OnClickListener() {
                    @Override
                    public void onClick(DialogInterface dialog, int which) {
                        LinkedList<HistoryRecordItem> itemList = (LinkedList<HistoryRecordItem>) supertestApp.findHistoryRecordList(editText.getText().toString());
                        Map<Integer, Boolean> checkList = supertestApp.historyRecordItemListToCheckList(itemList);
                        supertestApp.getHistoryRecordAdapter().refreshList(itemList, checkList);
                    }
                })
                .setNegativeButton("取消", null)
                .show();
参考: https://www.cnblogs.com/duoshou/articles/8622551.html
85. 自定义回调函数。
- 创建一个接口,接口里面是函数申明。
- 在模块类里面,需要一个成员接口,然后需要一个设定接口的函数,把实现的接口函数赋值给成员接口,然后在需要处理的地方,调用接口里面的函数。
- 在主类里面,把具体的实现接口的函数赋值给模块类里面的成员接口。
public interface UsbPlugSuccess {
    void plugSuccess();
    void plugRemove();
    void plugError();
}
USBBrdcstReceiver
      private UsbPlugSuccess usbPlugSuccess;

    public void setPlugSuccess(UsbPlugSuccess usbPlugSuccess) {
        this.usbPlugSuccess = usbPlugSuccess;
    }

        private void deviceInit(Context context, UsbMassStorageDevice device) {
        try {
            device.init();
            Log.d(TAG, "readDevice init ok!");
            Toast.makeText(context, "U盘插入,设备加载成功!", Toast.LENGTH_LONG).show();
            hasPlugOk = true;
            if (usbPlugSuccess != null) {
                usbPlugSuccess.plugSuccess();
            }
        } catch (Exception e) {
            Log.d(TAG, "device init failed: " + Log.getStackTraceString(e));
            Toast.makeText(context, "U盘插入,设备加载失败!", Toast.LENGTH_LONG).show();
            hasPlugOk = false;
            if (usbPlugSuccess != null) {
                usbPlugSuccess.plugError();
            }
        }
    }
ProjectManageFragment
        supertestApp.getUsbBroadcastReceiver().setPlugSuccess(new UsbPlugSuccess() {
            @Override
            public void plugSuccess() {
                checkImportButton(true);
            }

            @Override
            public void plugRemove() {
                checkImportButton(false);
            }

            @Override
            public void plugError() {
                checkImportButton(false);
            }
        });
参考: https://www.jianshu.com/p/7ac60e182449 https://www.cnblogs.com/yangjies145/p/7471849.html
