转自:http://blogs.umass.edu/Techbytes/2014/04/03/configuring-exchange-email-and-calendar-in-thunderbird/
Configuring Email clients can be a frustrating task due to the sheer number of different server settings that need to be properly entered in order for it to work properly and the variety of choices in desktop mail clients. Fortunately, this guide is written specifically for configuring UMass Amherst Exchange mail and calendaring for Thunderbird, an open source desktop mail client that is compatible with most Windows, OS X, and Linux distributions. For your convenience, the instructions and screenshots in this guide should exactly match what you see on your screen.
Installing Thunderbird
If Thunderbird is not yet installed on your computer, then you can download it here. Simply press the green download button and choose to run or save the file. When it is finished downloading, double click the file and then follow the instructions on the setup wizard.
To open Thunderbird, double-click the Thunderbird icon on your desktop.
Configuring Thunderbird
When you open Thunderbird for the first time, you will see:
Thunderbird_new_email
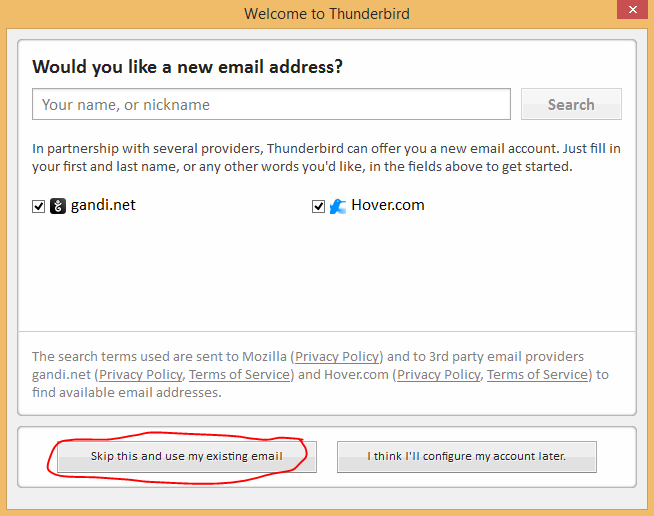
If you are not seeing this window, it can be accessed by clicking Email under the ‘Create a new account’ header. Click the ‘Skip this and use my existing email’ button which will bring you to the following screen:
Thunderbird mail account setup
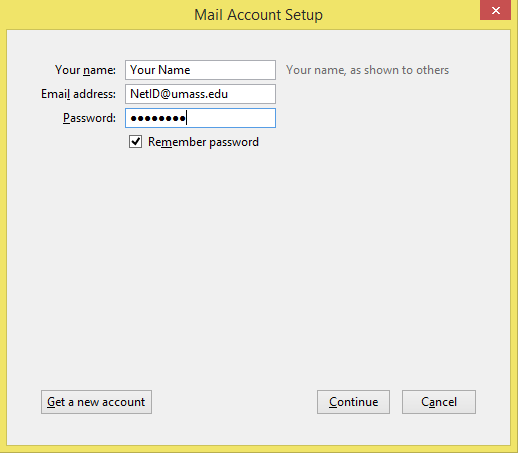
Enter the requested information. The important thing here is that for the Email address field, you should enter “NetID@umass.edu” even if that is not the email address that you receive mail at. For more information, click here.
When your name, email address and password are entered, press continue:
Click Manual Config button

Thunderbird will now try to automatically identify your accounts server settings, this will fail. Press the Manual Config button to see the manual server settings:
Thunderbird server setup
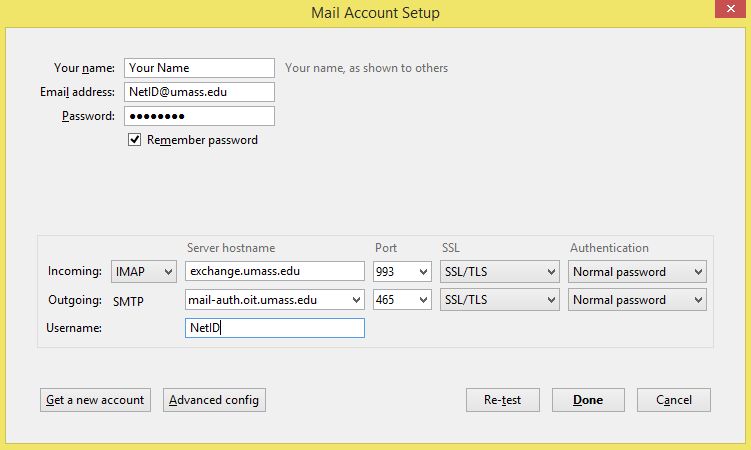
Change the SSL fields from Automatic to SSL/TLS and change Authentication fields from Automatic to Normal password for both the incoming and outgoing server. This should also automatically configure the Port fields to the values seen above. Finally, enter the following server hostnames:
Incoming: exchange.umass.edu
Outgoing: mail-auth.oit.umass.edu
Once you are finished, verify that your screen matches the above screenshot and then press the Done button. If everything was configured properly, the Mail Account Setup window should close, and you should be able to select your account from the left-hand side menu on the Thunderbird main screen.
Congratulations, Thunderbird is now able to send and receive messages using your UMass Exchange mail account.
Configuring your Exchange calendar with Thunderbird
Thunderbird does not come with calendar functionality by default, but it is easy to add by simply installing the Lightning Calendar Add-on.
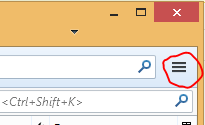
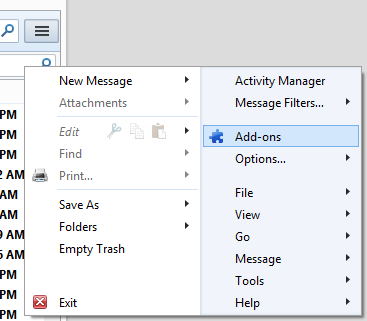
To install a Thunderbird Add-on, click on the Thunderbird options menu:
Thunderbird options menu
And then select Add-ons from the menu, which will open the Add-ons Manager tab:
Thunderbird Options Menu
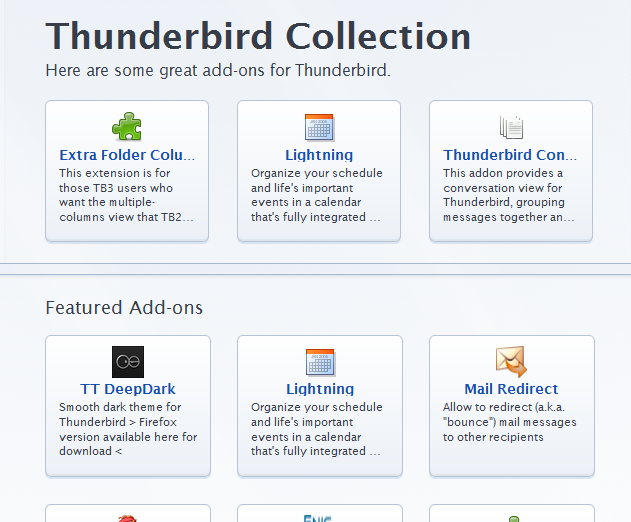
On the Add-ons Manager tab, select a link that says Lightning:
Thunderbird_addon
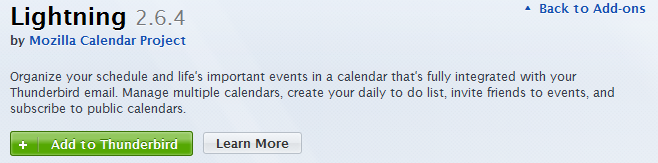
On the Lightning calendar screen, click the green Add to Thunderbird button:thunderbird_lightning_install
At this point a security warning may appear on your screen, if one does, press okay or continue.
If Lightning was installed correctly you should see the follow bar near the top of your Thunderbird window:
lightning_install

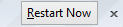
Press the ‘Restart Now’ button on the right hand side of the bar:
lightning_restart
At this point, the Lightning Calendar Add-on should be installed, but will not be configured with your Exchange calendar. What this means is that Thunderbird will have calendar functionality, but that any calendar you make will be saved locally on your computer’s hard drive, and will not be synced with the Exchange calendar you have on the UMass Exchange server.
The first step in configuring Thunderbird with your UMass Exchange calendar, is to download the Exchange EWS Provider extension, which will add to Thunderbird the capability to install server Exchange calendars. Once you have clicked above link, you will see a page with a list of different versions to download, simply select the newest one and choose to ‘Save’ it. The file that this downloads has to be manually installed by Thunderbird. First click open the Add-ons Manager tab (see above):
thunderbird_manual_plugin
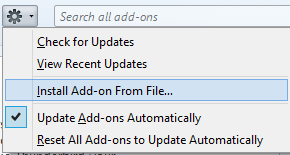
Then click the Gear icon to see the Add-on menu, and select “Install Add-on From File” as seen above. thunderbird_select_addon
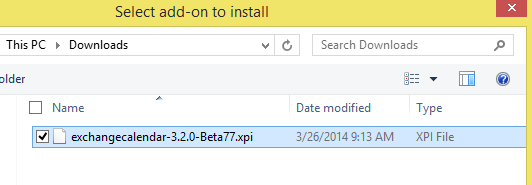
Using the file explorer, navigate to your Downloads folder and select the plugin that was previously downloaded. Note: you may have a different (newer) version of the plugin than is seen above, but the file name should look similar.
When the correct file is chosen, press the ‘Open’ button, and the once again select the ‘Restart Now’ button near the top right of your screen.
Thunderbird Calendar and Tasks buttons

Once Thunderbird is restarted, you will see the buttons pictured above near the top right of your screen. The left button will open the Calendar tab, and the right button will open the Tasks tab. Select either button:
thunderbird_new_calendar
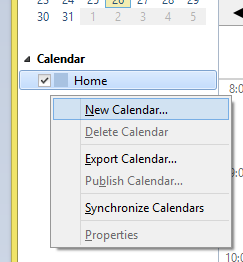
On either the Tasks or Calendar tab, you should see the Calendar side-bar on the left hand side of your screen. Right click anywhere under the ‘Calendar’ heading on this side-bar in order to see the menu that is pictured above. Select ‘New Calendar’.
The create New Calendar wizard will open. On the first screen, select ‘On the Network’ and then press ‘Next’. Then, select ‘Microsoft Exchange 2007/2010/2013’ (If you do not see this option it means that the Exchange Calendar extension was not properly installed) and then press the ‘Next’ button. You will then see a screen asking for a Name and Color for the calendar, this is for your own organizational purposes and can be whatever you want. Make sure the appropriate email address is selected and then press ‘Next’.
Thunderbird Calendar server settings
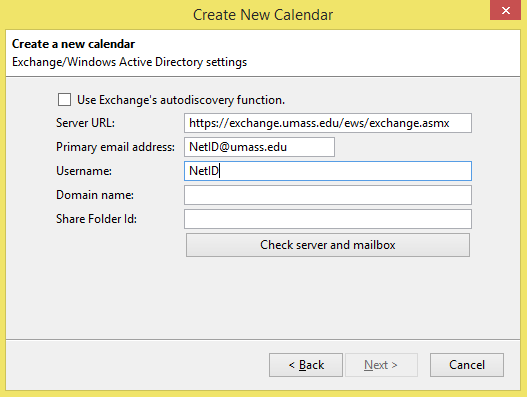
The next screen should look similar to the above screenshot. Enter the following:
Server URL: https://exchange.umass.edu/ews/exchange.asmx
The ‘Primary email address’ and ‘Username’ fields should be already filled out, but if not make sure they match the above screenshot.
Press ‘Check server and mailbox’. If everything was entered correctly, a window should pop up asking for your password, enter your Exchange password and then press ‘OK’.Thunderbird Configured Calendar
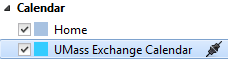
Your UMass Exchange Calendar is now configured and can be accessed by selecting it from the left-hand Calendar side-menu where you will see the name and color you chose for it during configuration.
Note: The ‘Home’ calendar can be deleted since it is unrelated to your UMass Exchange calendar. To delete a calendar, right click it and then select ‘Delete Calendar’.
How to access UMass Directories from Thunderbird:
It is possible to configure Thunderbird to have access to the same data as UMass People Finder, so that the email address of anyone related to the university can be looked up without leaving Thunderbird. To do this, follow this guide on the OIT website.
Note: The guide says to select ‘Account Settings’ from the ‘Tools’ menu. The ‘Tools’ menu is hidden by default and can be accessed by tapping the ‘Alt’ key on your keyboard.
This entry was posted in Linux, Mac OSX, Software, Windows on April 3, 2014 by agsheppa.
